Instructors: CourseLink Tools

The information on this page is intended for instructors using a CourseLink course site.

Webex

What is Webex?

WebEx is an online tool designed to facilitate online meetings, online classes, student group work and other collaborative coursework.


How to Login to Webex

  1. To login into Webex, please use your browser to go to uoguelph.webex.com


  2. Click on Sign In and provide your @uoguelph.ca (or @guelphhumber.ca) e-mail address.

    This will take you to the University’s single sign-on page.


  3. Please enter your UoG username and password and click on Sign in.


  4. You are now connected to your Webex profile.

WebEx1.png
Single sign on page for the university of Guelph. Username and password is being asked for.
Your Webex Profile. This lists upcoming meetings.
 

Schedule a Class or Meeting (single or recurring)

This image shows the user scheduling a new meeting.
This image has the user setting up the recurrence of the meeting every week on Thursdays.
  1. Click on Schedule.

  2. Enter a name for your meeting in the Meeting Topic field (E.g. Biology 101)

  3. Keep meeting password unchanged or change as desired

  4. Set date and time for the session you are trying to book

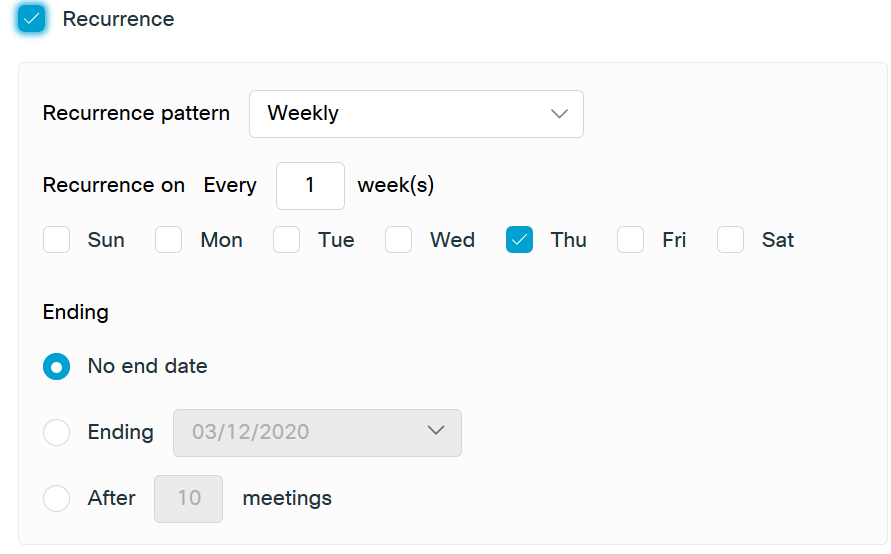
    o   If this is a recurring meeting, please check the Recurrence field to open the options

  5. In the attendees list, enter names (or e-mail addresses) of students that should attend your session. 
    *If you have a list of comma (or semi-colon) separated e-mail addresses, you can copy and paste them into the field.


    *See also: Alternative Method of sending meeting to large number of participants”*

  6. Click on Save to complete the scheduling.


Start your Webex Class or Meeting

The image has the meeting time from 11:30pm - 12:30am and the start button is located to the right.
The image is asking the user to confirm their audio and video connection with a green Connect Audio and Video button at the bottom.
  1. On your webex home page, find the session you want to start under “Upcoming Meetings” meetings.

  2. Click on “View all meetings” if you can’t see the session you are looking for on the initial list.

  3. Click the “Start” button on the session you want to launch.

  4. Students are able to join your session, once you started it.

  5. When prompted, choose your audio and video preferences and then click on “connect Audio and Video”.


Start your Webex Class or Meeting

Image has the options that the host would have during the meeting like share screen.
Image shows what happens after clicking share screen button. It makes you select what you want to share.
Image shows the options the host has when sharing the screen. They can stop by clicking "Stop Sharing".
  1. To share content, click on the Share button (box with arrow pointing up)


  2. Choose what to share from the options presented


  3. After you share your screen, the control panel will move to the top of the screen and look like this


Recordings

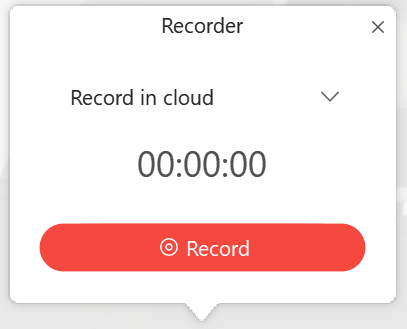
  1. To record your session, click the Recorder button (circle with red dot)


  2. Ensure the option Record in cloud is selected before you click Record


  3. Click on the X to close the recording window.


  4. To end or pause recording, click on the recorder button again for options.

    o   Ending a meeting will also stop the recording.


  5. To access your recording, go to your Webex home page

  6. Click on Recordings on the left hand side

  7. Choose the recording of your session


  8. To edit what is available when shared, click the More button (circle with 3 dots) and select Edit. From here you can remove components of your recording, if so desired.


  9. To access the link to the recording, click on the share button on the right side


  10. Copy the link and paste to Courselink as required.

    Note: To restrict access to the recording to “UoG only”, click on “Anyone with the link can view this recording” and switch to “People in my company can view this recording

Check “advanced options” for further ways to customize your meeting (e.g. chat & participant list views)

  • Meeting Options

  • Attendee Privileges

Image has the options that the host would have during the meeting like recod meeting.
Image shows the options the host has when sharing the screen. They can stop by clicking "Stop Sharing".
Image has a Recorder window with the dropdown option Record in cloud option selected. A red Record button is at the bottom.
The image is the My Recorded Meetings.
Image show the Edit Recorded Meetings page with editing options that changes what students see from the meeting.
The image is on the Share recording options. You can enter emails to share with people and add a message. When you are ready click save

Options to consider

  • Scheduling options > Require account

  • Audio connection options > Entry and Exit tone : No tone

  • Note: if you want to allow someone to start the meeting in your absence, click the silhouette beside their name to highlight them (e.g.: your TA for the class)


Best practices

The preferences page
  • Use a headset with microphone if you are the host/presenter.

  • After the meeting is started, click on Participant > Mute on entry

  • Participant > uncheck entry & exit tone

  • Set recording preferences:


Related Tools


Need More Help?

If you're still having trouble, please contact the CourseLink Support team for assistance.


Virtual Classroom

What is the Virtual Classroom tool?

The Virtual Classroom meeting space allows instructors, trainers, and learners to engage each other with livestream video. Instructors can engage a large audience and connect up to 7 simultaneous webcams. 

Use Cases:  

  • office hours

  • training sessions

  • live lectures

Accessing the Virtual Classroom Tool

The Virtual Classroom is not one of the default links in the navigation bar of your CourseLink course site, therefore you will need to add it your navigation bar. To do so please follow the instructions provided in the Customize Navbar section.

For Distance Education (DE) courses, the link appears under the drop-down menu of the Tools link on the navigation bar (provided that the course is using Dropbox).

Location of the Dropbox link on a DE course site


Using the Virtual Classroom tool?


Click Virtual Classroom. This will take you to the Virtual Classroom page.


Within the menu, select Scheduled Meetings.

schedule meeting red button with a white plus in the middle.

SCHEDULE

Once you are on the Scheduled Meetings page, you can add a new Virtual Classroom session (Click the Plus icon in the lower right corner).

Name the meeting, then enter the date and time. If you would like the meeting to start immediately, select Now. Moderators can also enter meetings 10 minutes early to get started before others arrive.

Note: Depending on your organization’s membership, your maximum number of users may vary. You can also share up to 7 simultaneous webcams.

schedule meeting settings. It has title, timing options, cancel and save at the bottom.

Depending on your organization’s setup, you may or may not have the options highlighted in gray in the image above. If you do have these options, expand the button below to learn more.

When you are ready, click Save.

schedule meeting settings. It has title, timing options, cancel and save at the bottom.

Once the meeting is scheduled, you can invite others – as well as edit or cancel the meeting. When the meeting time arrives, you will launch the Virtual Classroom meeting

Edit or Cancel

To Edit the date/time or Cancel, click on the vertical ellipsis on the right-side of the meeting name to bring up the needed menu: 


To prepare for your Virtual Classroom meeting, learn more about the features available to you


VIRTUAL Classroom Basics


PRESENT & COMMUNICATE


SETTINGS & TROUBLESHOOTING


Tutorial Videos


Virtual Classroom FAQs


Related Resources and Programming:

Coming Soon!


Related Tools


Need More Help?

If you're still having trouble, please contact the CourseLink Support team for assistance.


Rubrics

What is the Rubrics Tool?

Rubrics are an assessment tool used to evaluate an activity or item based on a predefined set of criteria. They help ensure that activities and items are evaluated fairly and consistently.

Accessing the Rubrics Tool

  1. Click Course Admin on the navigation bar

  2. Select the Rubrics tool (if you have categories enabled, it will appear under the Site Resources heading)

Location of the Course Admin link on a face-to-face course site

Location of the Rubrics tool under Course Admin - Assessment with a red box and a red arrow pointing to it

Location of the Rubrics tool under Course Admin - Assessment


Using the Rubrics Tool

For the most up-to-date information on how to use the Rubrics tool, please follow the links below to the Brightspace Help documentation site.


When and why should you consider using the Rubrics tool? 

Rubrics allow you to grade assignments fairly and consistently; especially when multiple users are performing the evaluation. It allows students to understand the criteria that they are being graded against, and how they are fairing.

Setting up a rubric can improve the rate you can evaluate work by, provide consistent and accurate scoring and feedback - especially in large classes, or where students complete multiple assignments that will be marked to the same criteria.


Tutorial Videos


Rubric Tool FAQs


Related Resources and Programming:

Coming Soon!


Need More Help?

If you're still having trouble, please contact the CourseLink Support team for assistance.


I-CL-AssessmentGuest User
Content

What is the Content Tool?

The Content tool is used to access course materials, complete required activities, and monitor completion progress on topics contained within each course module.

Accessing the Content Tool

The Content tool is one of the links found on the default navigation bar of your CourseLink course site and can be accessed directly from that link.


When and why should you consider using the Content tool?

The Content tool enables instructors to post and organize course content so that the course syllabus, lecture notes, important dates, and information about course expectations display to users clearly.

Course materials you post in Content can include documents, images, media files, URL links, and activities (e.g. discussions, quizzes, surveys, self assessments, and Dropbox folders). You can add release conditions, grade items, and learning objectives for topics to ensure users navigate through course materials while fulfilling specific course requirements and learning expectations.

You can also monitor class and user progress as students work through course content. Completion tracking allows instructors to determine how content topics are set as “complete” (set automatically by the system or manually by the student). You can track these results on a student-by-student and class basis by viewing user progress and class progress in the User Progress tool.

I-CL-ContentGuest User
Quizzes

What is the Quizzes Tool?

The Quizzes tool enables you to create and manage points-measured assessments. As part of your quantifiable assessment procedures, you can use quizzes to help evaluate users’ learning progress and learning outcomes. Quizzes also provide users with feedback on their learning progress. Users can take a quiz, review their quiz results, and see class statistics for a quiz.

Create and manage quiz questions from the Question Library or the Quizzes tool, and organize quizzes into categories to make it easier to find assessments with similar or related content. Use the quiz preview option to test the accuracy of content and grading before you release a quiz. In a preview, you can answer the questions, view allowed hints, submit the quiz, auto-grade answers, read feedback, and view report results.

You can also view quiz statistics such as grade distribution, grade average, question statistics, and user statistics on the Statistics page for completed quizzes.

Accessing the Quizzes Tool

The Quizzes tool is not one of the links found on the default navigation bar of your in-class CourseLink course site. The Quizzes tool will need to be Added to your Navbar.

For Distance Education (DE) courses, the Quizzes link appears under the drop-down menu of the Tools link on the navigation bar (provided that the course is using Quizzes).


Set up Timing & Display

You can create a time limit for your quiz and set up how the quiz displays to learners.

To set a time limit

To set a time limit and enter the length of time for the quiz:

  1. From the New Quiz page, click to expand the Timing & Display drop-down menu.

  2. Select Set time limit.

  3. In the Time Limit field, specify the length of time for the quiz in minutes.

  4. Click Timer Settings and do one of the following.

    • If you want to automatically submit the quiz when the time limit is exceeded, select Automatically submit quiz attempt. *Please note that submitted attempts cannot be reopened.

    • If you want learners to be able to continue working after the time limit, select Flag as time limit exceeded and allow the learner to continue working.

    • If you do not want to enforce the time limit, select Do nothing: the time limit is not enforced.

  5. If you have completed customizing your quiz, click Save and Close.

Setting up a synchronous quiz in the New Quiz Experience

  1. On the navbar, click Quizzes.

  2. On the Manage Quizzes tab, click New Quiz or one of the quizzes you would like to edit.

  3. On the Quiz Creation screen, click to expand Timing & Display.

  4. Check Set time limit, then enter a Time Limit in minutes.

  5. Click Edit Timer Settings.

  6. In the Timing dialog, under Quiz Start, select Synchronous: Timer starts on the start date.
    Note: If there is no Start time and date set for the synchronous quiz, a No start date set alert appears under the radio button option and you are not able to save the quiz. Due date is disabled for synchronous quizzes. End date is not necessary but can be added.

  1. Under When The Time Limit Expires, select one of the following:

    • Automatically submit the quiz attempt

    • Flag as "exceeded time limit" and allow the learner to continue working

    • Do nothing: the time limit is not enforced

  2. Click OK.


Inserting Images into Questions

1. Select your Question type (E.g. Multiple Choice)

Image shows the new question dropdown highlighting the MC type question with a light blue background

3. Select the method in which you would like to upload your
image into the question (E.g. desktop file, url link, etc.)

Add a file page is open and options to add a file are listed in the image.

2. Select the Add Image icon within the text box.

Image is on the MC page where you can create a MC type question with question text and the associated answers. The add image button is highlighted.
 
I-CL-AssessmentGuest User
Grades

What is the Grades Tool?

Use the Grades tool in your course to share grades with students for various assessments, calculate class averages, and provide feedback . You can set up a gradebook that reflects your own approach to evaluation where you can control the grading formula used to calculate grades, how grade items are associated with other tools, when grades are released to users and what information they see.

Accessing the Grades Tool

The Grades tool is one of the links found on the default navigation bar of your CourseLink course site and can be accessed directly from that link.

nav-f2f-grades.png

For Distance Education (DE) courses, the link appears under the drop-down menu of the Tools link on the navigation bar.

If you are using a custom navigation bar and the Grades link has been removed, you may re-add it. For more information on that process, please see our Navigation Bar page.

Using the Grades Tool

For the most up-to-date information on how to use the Discussions tool, please follow the links below to the Brightspace Help documentation site.

Getting started

GRADE EXEMPTIONS

MANAGING GRADES


When and why should you consider using the Grades tool? 

The Grade tool is a great way to collect and organize student grades online. There are many advantages to using the Grade tool including:

GRADING AND ASSESSMENT

Grade items represent the individual assignments, quizzes, performance measurements, etc., that you want to grade users on. Each grade item has its own entry in the grade book, which you assign a grade to for each user. Grade items can be tied to other course objects, such as quizzes or discussion forums, or they can exist independently. Grade items can be graded numerically, based on a grade scheme, or with a simple text message, depending on the grade item type chosen.

ORGANIZING GRADES

Use grade book categories to organize and group related grade items into sections. For example, you could have separate categories for Dropbox Submissions, Quizzes, Case Studies, Participation, Discussions, and so on. When grade items are grouped together in a category, you can distribute points equally across all grade items and drop the highest or lowest item in the group.

IMPORTING AND EXPORTING GRADES

You can enter grades in another application, such as Microsoft Excel, and import them into CourseLink using a CSV or TXT file. You can also create new grade items through an import file by adding a column to the file.

The import file must follow a standard format; use the Grades sample import file as a reference point. We recommend that you set up your grade book in CourseLink even if you want to enter grades in a CSV or TXT file. You can then use the Export Grades option to create an appropriately structured file.

CREATING A GRADE FORMULA

Use the Formula Editor to define a formula that calculates a grade item’s value based on other grade items. When you create a formula, you specify which grade items you want included in the formula and the relationships between them. An example of a simple formula is one that calculates the sum of a number of grade items. A more complicated formula is one that drops the minimum or maximum value from a set of grade items.

The Formula Editor is available on the New Item page and Edit Item page for Formula items, and the Edit Calculated Final Grade page and Edit Adjusted Final Grade page for the Formula grading system.

Formula examples:

Give users who achieved over 85% on all items in the category 100%.
=IF{MIN{[Week1.Percent],[Week2.Percent],[Week3.Percent]}<85,0,100}

Find the best 2 out of 3 grades.
=MAX{[G1.Points Received],[G2.Points Received]} + IF{(MAX[G2.Points Received],[G3.Points Received]} = MAX{[G1.Points Received],[G2.Points Received]}), MAX{G1.Points Received],[G3.Points Received]}, MAX{[G2.Points Received],[G3.Points Received]}}

TRACKING GRADE EVENT LOGS

Event logs maintain a record of changes made to your grade book. The logs can be useful when auditing a grade book, managing teaching assistants, and discussing grades with users.

  • User Grades Event Log records all of the changes made to a particular user’s grades.

  • Grade Item Event Log records changes to users’ grades on a single grade item.

  • Final Grade Event Log records changes to users’ final grades.

  • Manage Grades Event Log records changes made to the properties or restrictions of a specific grade item.

  • Restoring Grade Item Event Log records the date and time a grade item is created or removed, and the user who performs the action.

PREPARING FINAL GRADES

Please refer to the section on Final Grades Download Tool.

Video Assignments

What is the Video Assignments tool?

The Video Assignments tool can help students develop their communication, collaboration, and critical thinking skills. There are 4 different Video Assignment types you can use within Bongo:

  • Individual Project

  • Question & Answer

  • Group Project

  • Interactive Video

Accessing the Video Assignments Tool

The Video Assignments tools is not one of the default links in the navigation bar of your CourseLink course site, therefore you will need to add it your navigation bar. To do so please follow the instructions provided in the Customize Navbar section.

For Distance Education (DE) courses, the link appears under the drop-down menu of the Tools link on the navigation bar (provided that the course is using Dropbox).

Location of the Dropbox link on a DE course site


Using the Video Assignments tool?

For the most up-to-date information on how to setup a Dropbox folder, please follow the links below to the Brightspace Help documentation site.

The image has a red arrow pointing to 3 lines in a red circle

Click Assignments. This will take you to the Assignment List page.

Select Assignment Type

Once you are on the Assignment List page, click the Plus icon in the lower right corner. 

Pick the video assignment type that best suits your desired outcomes: 

Add Assignment to Content

After creating an assignment within Brightspace, you will need to add the assignment to Content so users can see the assignment. Click Content

Content highlighted in light red

When you click on Content, the Table of Contents will display. Click on the Add Existing Activities button.


Click Add Existing Activities dropdown button is highlighted in light red

From the dropdown, select Video Assignment.


Video Assignment dropdown option highlighted in a light red

The Add Activity box will appear. To add a particular assignment to a user’s course, select the desired assignment.


Video Assignment Basics


Tutorial Videos


Video Assignments FAQs


Related Resources and Programming:

Coming Soon!


Related Tools


Need More Help?

If you're still having trouble, please contact the CourseLink Support team for assistance.


Surveys

What is the Surveys Tool?

Create surveys and use the statistics tools to monitor current course trends, seek opinions, and assess user satisfaction.

Surveys are an excellent way to solicit feedback from users regarding any aspect of your course. For example, they can be used as a method of collecting course evaluations, mid-year reviews, or researching users’ learning style and content delivery preferences.

Accessing the Surveys Tool

The Surveys tool is not one of the links found on the default navigation bar of your in-class CourseLink course site. The Surveys tool will need to be Added to your Navbar.

A red arrow is pointing at the Surveys tool link

For Distance Education (DE) courses, the Surveys link appears under the drop-down menu of the Tools link on the navigation bar (provided that the course is using Surveys).

A red arrow points to the Surveys Link


When and why should you consider using the Surveys tool? 

Create surveys and use the statistics tools to monitor current course trends, seek opinions, and assess user satisfaction. Surveys are an excellent way to solicit feedback from participants regarding any aspect of a course. For example, use surveys as a method of collecting course evaluations, mid-year reviews, or researching people's learning styles and content delivery preferences.


Related Tools


Need More Help?

If you're still having trouble, please contact the CourseLink Support team for assistance.


Navigation Bar

What is the NavBar Tool?

The navbar contains links to course-specific and CourseLink-wide tools and resources. Each course has its own navbar that links to relevant tools for that course. You can create custom links and link groups if you want; including URL links to third-party tools, external websites and other areas of CourseLink.

The NavBar always stays on visible to users while they navigate your course site, and sits between the CourseLink-wide tools in the MiniBar and the content the user is currently using.

Accessing the NavBar Tool

The NavBar tool always stays visible in your course site. Hovering over the NavBar will bring the NavBar action menu up on the NavBar.

From the NavBar action menu, select ‘Customize This NavBar’ to make changes to a default NavBar.

Custom Link Groups

Custom link groups are a set of individual links that grouped together. They can be created with link group names to categorize relationships between similar features of each group.

1. To create custom link group, navigate the NavBar and select Manage All Course Navbars.

Red box around the Manage all Courses Navbars option

2. From the tool Navigation click Custom Links > Create Link Group.

Create Link Group in a red box and to the right of Create Link button

3. Enter a name, icon and description for the link group.

4. In the Links area you have the option to do either of the following

  • Select Add Existing Link to add an existing link to the group. Click Add.

  • Select Create Link to add a new link to the group. Enter the link and click Create.

5. Click Save.

Using the NavBar Tool

For the most up-to-date information on how to use the NavBar tool, please follow the links below to the Brightspace Help documentation site.


Tutorial Videos


NavBar Tool FAQs


Related Resources and Programming:

Coming Soon!


Related Tools


Need More Help?

If you're still having trouble, please contact the CourseLink Support team for assistance.


Widgets

What is the a Widget?

The homepage is the first page you see when you view the organization's My Home page or enter a course. The typical default homepage is widget-based. Widgets are sections of content that provide information and links to tools, courses, and personal settings. Organization and course homepages can point to Brightspace Learning Environment tools, such as Announcements or Content, or an external URL.

Widgets are the building blocks of homepages. You can create, edit, delete, customize, and preview the widgets in your organization.

Accessing the Widget Tool

The Widget tool is found under Course Admin in your Navbar, under Site Setup, if you are sorting tools by category.


Using Widgets

For the most up-to-date information on how to use widgets, please follow the links below to the Brightspace Help documentation site.


When and why should you consider using Widgets?

System widgets are available as part of CourseLink and cannot be edited or deleted, but you can remove them from a homepage or move them to a different section of a homepage using the Homepage Management tool. Additionally, you can change the appearance of system widgets using the same properties as custom widgets (i.e., border style, title bar color and more).

Custom widgets allow you to expand the functionality of available content in your homepages to suit your specific organizational and/or course needs. You can add custom HTML code to create a wide range of widgets.

Tutorial Videos


Related Tools


Need More Help?

If you're still having trouble, please contact the CourseLink Support team for assistance.


Homepages

What is the Homepage Tool?

The homepage is the first page you see when you view a course. The typical default homepage is widget-based. Widgets are sections of content that provide information and links to tools, courses, and personal settings. Organization and course homepages can point to CourseLink tools, such as Announcements or Content, or an external URL.

All new courses are initially set up with a default course homepage by CourseLink support. You can use the Homepage Management tool to create a new homepage and set it as the active homepage for your course.

Accessing the Homepage Tool

The Homepage tool is found under Course Admin in your Navbar, under Site Setup, if you are sorting tools by category.

Location of the Homepages link on a DE course site
 

Using the Homepage Tool

For the most up-to-date information on how to use the Homepage tool, please follow the links below to the Brightspace Help documentation site.


Tutorial Videos


Related Tools


Need More Help?

If you're still having trouble, please contact the CourseLink Support team for assistance.


Turnitin (Dropbox Integration)

What is the Turnitin Dropbox Integration?

Turnitin is a cloud-based solution with capabilities in originality checking and online grading using their OriginalityCheck and GradeMark tools. Turnitin saves instructors time and facilitates personalized feedback for learners.

OriginalityCheck lets you monitor Assignment submissions and identify potential cases of plagiarism by automatically comparing submissions to an online database of original content. You can then view Originality Reports which highlight key areas, show a breakdown of matching sources, and provide direct links to the matching content.

You can also take advantage of the integrated GradeMark which lets you add comments, inline text, and highlight sections in file submissions, directly from the Dropbox tool.


Initial Considerations

Turnitin is an originality checker, not a plagiarism detection tool. Determining plagiarism requires human judgment, on the part of course instructors, and perhaps most importantly on the part of students. To recognize plagiarism, is essential that students understand the concept of academic integrity as well as the various components of academic writing, including proper citation and use of sources.

Turnitin needs to be used as a learning tool, engaging with students and the writing process, when appropriate, allowing students to submit multiple drafts. Instructors can work with Writing Services at the Library to tailor activities that will help students understand and recognize proper academic writing.

Instructors are encouraged to take a curricular approach to the use of Turnitin and integrate its use with the course’s overall approach to academic writing within the programme curriculum. It should be part of a larger effort to promote students’ understanding academic integrity.

Turnitin should be aligned with the students’ academic progress. The approach with first year students may be different than with students later on in their degree. Use of the tool should be aligned according to the writing and academic integrity needs of the specific discipline.

Finally, consider designing plagiarism-resistant assignments.


GradeMark

Another feature of Turnitin is GradeMark, a tool which facilitates the marking of online assignments and the providing of feedback. The GradeMark tool includes inline commenting and markup, saving paper and providing quick and detailed comments to students within CourseLink, the online learning management system. This feature streamlines the marking process providing instructors with a collection of pre-formatted comments, but also allows faculty to add more detailed individual comments.

Please note that GradeMark must be enabled to activate the Originality Check option. However, you do not need to use GradeMark to assess Dropbox submissions once the feature is enabled.


What file types are supported in OriginalityCheck?

The following file types are compatible with OriginalityCheck:

  • Microsoft Word (DOC, DOCX)

  • Corel WordPerfect (WPD)

  • Adobe PostScript (EPS)

  • Adobe Acrobat PDF

  • HTML (HTM, HTML)

  • Rich text (RTF)

  • Plain text (TXT)

If students are submitting other file types to a dropbox with Turnitin enabled, they will have to enable Turnitin for all files.


Enable Turnitin Integration for a Dropbox

To enable Turnitin for a dropbox assignment, do the following:

A red arrow is pointing at dropbox
  1. From the Dropbox tool, click New Folder or click on the arrow to the right of the folder and click edit.

    i. Give the dropbox a name.

  2. Expand Evaluation and Feedback.

  3. Scroll down and click “Manage Turnitin”.

  4. Click Enable Turnitin for this folder.

  5. Once enabled, you can continue to create the details for the new assignment, including more options in Turnitin, such as configuring OriginalityCheck and GradeMark functionalities.

  6. Click Save and Close.


Using the Dropbox Turnitin Integration

For the most up-to-date information on how to use the Dropbox Turnitin Integration, please follow the links below to the Brightspace Help documentation site.

List


Informing Students

For those instructors intending to use Turnitin in their course, it is required that you inform your students accordingly within your Course Outline. The Course Outline Checklist provided by the Associate Vice President Academic includes a section about “Academic Misconduct.” We recommend that within this section of your Course Outline you include commentary about plagiarism and the use of Turnitin.

Here are example statements on Turnitin and Academic Misconduct:

Turnitin

In this course, your instructor will be using Turnitin, integrated with the CourseLink Dropbox tool, to detect possible plagiarism, unauthorized collaboration or copying as part of the ongoing efforts to maintain academic integrity at the University of Guelph.

All submitted assignments will be included as source documents in the Turnitin.com reference database solely for the purpose of detecting plagiarism of such papers. Use of the Turnitin.com service is subject to the Usage Policy posted on the Turnitin.com site.

A major benefit of using Turnitin is that students will be able to educate and empower themselves in preventing academic misconduct. In this course, you may screen your own assignments through Turnitin as many times as you wish before the due date. You will be able to see and print reports that show you exactly where you have properly and improperly referenced the outside sources and materials in your assignment.

Academic Integrity

The University of Guelph is committed to upholding the highest standards of academic integrity, and it is the responsibility of all members of the University community-faculty, staff, and students-to be aware of what constitutes academic misconduct and to do as much as possible to prevent academic offences from occurring. University of Guelph students have the responsibility of abiding by the University's policy on academic misconduct regardless of their location of study; faculty, staff, and students have the responsibility of supporting an environment that encourages academic integrity. Students need to remain aware that instructors have access to and the right to use electronic and other means of detection.

Please note: Whether or not a student intended to commit academic misconduct is not relevant for a finding of guilt. Hurried or careless submission of assignments does not excuse students from responsibility for verifying the academic integrity of their work before submitting it. Students who are in any doubt as to whether an action on their part could be construed as an academic offence should consult with a faculty member or faculty advisor.

Undergraduate Calendar - Academic Misconduct

Graduate Calendar - Academic Misconduct


Resources

Academic Integrity

Donald L. McCabe and Gary Pavela, Ten (Updated) “Principles of Academic Integrity: How Faculty Can Foster Student,” Change, Vol. 36, No. 3 (May – Jun., 2004), pp. 10-15
, http://www.tandfonline.com/doi/pdf/10.1080/00091380409605574

Julia M. Christensen Hughes and Donald L. McCabe, “Academic Misconduct within Higher Education in Canada,” Canadian Journal of Higher Education Revue canadienne d’enseignement supérieur, Volume 36, No. 2, 2006, pages 1 – 21, http://eric.ed.gov/?id=EJ771043

Julia M. Christensen Hughes and Donald L. McCabe, “Understanding Academic Misconduct,” Canadian Journal of Higher Education Revue canadienne d’enseignement supérieur, Volume 36, No. 1, 2006, pages 49 – 63, http://eric.ed.gov/?id=EJ771037

Plagiarism

“Best Practices for Preventing Plagiarism” Webster University, http://www.webster.edu/faculty/ppp/best-practices-for-preventing-plagiarism.html

University of Guelph Resources

AVPA, “Course Outline Checklist” http://www.uoguelph.ca/vpacademic/avpa/checklist/

“Academic Misconduct,” Undergraduate Calendarhttps://www.uoguelph.ca/registrar/calendars/undergraduate/current/c08/c08-amisconduct.shtml

Tutorial Videos


Turnitin FAQs


Turnitin Support Documentation


Related Tools


Need More Help?

If you're still having trouble, please contact the CourseLink Support team for assistance.


My Courses

What is the My Courses Widget?

The My Courses widget resides on the CourseLink My Home page that displays immediately after logging in and displays a list of course sites that a user has or has had access to on CourseLink. It can be used by any user with CourseLink access to to locate and access (provided the course site is currently accessible to their role) specific course sites where they have been granted access. Instructors can also use this widget to customize the course image that has been assigned to their course site.


Accessing the My Courses Widget

The My Courses widget is located on the CourseLink My Home page, which is the page a user lands on right after logging into CourseLink. Each course site to which a user has/had access to will be listed in this widget and will be represented by an image and title.


Using the My Courses Widget

Users can navigate to one of their course sites by clicking the card containing the name and image of a course offerings in this widget.

What Course Sites Are Displayed?

By default up to 12 current and upcoming course sites to which a user’s account has access will display under the All tab. This will include all courses to which a user has access, regardless of what role they have in them. It will also include resource course sites that accounts are automatically enrolled in with no end dates such as General Security Awareness, but will not include course sites that are past their closed date (i.e. course sites from a previous semester).

Locating Specific Course Sites

A user can view all of their course sites by clicking the link to View All Courses located at the bottom of the widget. This link will include a count in parentheses to indicate how many courses you have/had access to on CourseLink.

A user can also select a specific semester from the tabs along the top of the widget to see all the course sites to which you have/had access in that semester. Please note that CourseLink will remember the last selected semester the next time you access My Home/My Courses.


The All Courses Page

Clicking the View All Courses link will also take a user to a the All Courses page where they can search for a specific course via the Find a Course and Advanced Search features.

A user may use the Filter and Sort options to organize and display a custom list of their course sites.

This page also contains the same semester tabs for sorting course sites as are found on the widget.


Past courses will display the date and time access to that course site ended (i.e. Ended April 29, 2019 at 12:00 AM) and indicate that a site is closed in the bottom-left corner of the course image.

Upcoming courses will display the date and time that access to a course site will start for student-level roles (i.e. Starts September 7, 2019 at 12:00 AM).

Currently open course sites will display the end date and time for student and TA access (ie. Ends August 29, 2019 at 12:00 AM). The instructor role will allow access to closed courses.


Access to Course Sites by Role

  • Users with instructor roles in course sites are able to access them at any time, including outside of the start and end dates.

  • Users with teaching assistant roles in course sites are able to access them prior to their start dates, but not after their end dates.

  • Users with student-level roles only have access to course sites between the start and end dates.

Pinning a Course

Pinning a course keeps it on the My Courses widget, regardless of whether it is currently open or closed, which can be handy if you are frequently working on a course site that is not appearing on your My Courses widget by default.

To pin a course to your my courses widget, please follow these steps:

  1. Hover your cursor over the course icon

  2. Select the 3-dot icon that appears

  3. Select Pin

  4. The course pinned will now display in the Pinned tab

Using My Courses to customize your Course Image

The course image is what displays to students as part of the course icon under My Courses. A random stock image is inserted when the course is first created, but it can updated depending on your preference.

To change you course image, please follow these steps:

  1. Hover your cursor over the course icon

  2. Select the 3-dot icon that appears

  3. Select Change Image


Tutorial Videos


Related Tools


Need More Help?

If you're still having trouble, please contact the CourseLink Support team for assistance.


ePortfolio

What is the ePortfolio Tool?

The CourseLink ePortfolio is a personal portfolio tool for storing, organizing, reflecting on, and sharing items that represent your students' learning. They can include items such as documents, graphics, audio files, videos, presentations, and course work to demonstrate improvement or mastery in certain areas.

Students can control what items to include in their portfolio, how they are organized, and who they want to share them with. Students can share items with peers, mentors, or potential employers, and can give them permission to view items, edit items, see or add comments, and see or add assessments to receive feedback.

Accessing the ePortfolio Tool

The ePortfolio tool, unlike most other CourseLink tools, works at the organizational-level, not at the course-level. This means that the tool is available to all users across CourseLink, regardless of whether it is being used in the specific course sites to which a user has access.

Because ePortfolio is an organizational-level tool, it can be accessed from the My Home page of CourseLink, immediately after logging in.

An instructor may elect to add an additional link to the ePortfolio tool on their course navigation bar as well if they wish.


Using the ePortfolio Tool

For the most up-to-date information on how to use the ePortfolio tool, please follow the links below to the Brightspace Help documentation site.

Share items in courses

Integrating Brightspace ePortfolio with Content

Assessing Brightspace ePortfolio content in Brightspace Learning Environment


When and why should you consider using the ePortfolio tool? 

Tutorial Videos

Please note that while the videos below target learners/students, the tool can also be used by instructors in a similar capacity.


ePortfolio Tool FAQs


Related Resources and Programming:

Coming Soon!


Related Tools


Need More Help?

If you're still having trouble, please contact the CourseLink Support team for assistance.


Groups

What is the Groups Tool?

Create group work areas for users with the Groups tool. You can use Groups to organize users’ work on projects and assignments.

Users can belong to multiple groups within the same course. For example, each user can simultaneously belong to a group for class projects, a group for special interest discussions, and a group for advanced users. Each group can have its own Discussion forums, Dropbox folders, and Locker area to work in. You can grade members of groups individually or as a team.

Accessing the Groups Tool

The Groups tool is one of the links found on the default navigation bar of your CourseLink course site and can be accessed directly from that link.

For Distance Education (DE) courses, the Groups link appears under the drop-down menu of the Tools link on the navigation bar (provided that the course is using Groups).


Using the Groups Tool

For the most up-to-date information on how to use the Groups tool, please follow the links below to the Brightspace Help documentation site.

Working with Groups

Groups and Discussions


groups vs. Sections

If you want users to see all users and content for a course but be a part of a group for a specific project or activity, use the Groups tool. However, if you want users to only see learning materials and users from their own section, use can use the pre-populated sections included in your course site. Those sections reflect the section enrolments sent to CourseLink from the Registrar’s Office and are updated daily.

To organize users' work on projects and assignments or to create special work areas for users with different learning needs, use the Groups tool.

Additional Groups Tool Tips

  • Users can belong to multiple groups within the same course

  • For each group, you can create separate discussion forums, Dropbox folders, and Locker areas to work in

  • Note that the grade assigned via a group Dropbox folder will cascade to all group members, but that grade can be adjusted individually via the Enter Grades page after it is transferred

  • Before setting up groups, consider how you want to organize them. The following factors can affect how users enroll in groups:

    • Setting groups up before or after you've enrolled users

    • Enabling auto-enrollment in groups

    • Enabling randomization of users in groups

    • Enabling self-enrollment in groups

    • The Enrollment Type you choose

  • When possible, try to set up groups after the majority of users enrol in your course. This gives you a better idea of how many users you are organizing and how many groups you need. Setting up groups after enrollment can also ensure better distribution of users between groups.

  • For users to enroll in groups automatically, the can be auto enrolled into groups permission must be enabled. Contact your site administrator if you experience difficulties.

  • When using self-enrolment groups, please note that students will not be able to remove themselves from a group once they have selected it, but the instructor or TA can remove them from the group allowing them to re-enrol in a new group


When and why should you consider using the Groups tool? 

Tutorial Videos


Groups Tool FAQs


Related Resources and Programming:

Coming Soon!


Need More Help?

If you're still having trouble, please contact the CourseLink Support team for assistance.


Classlist

What is the Classlist Tool?

Use the Classlist tool to view who’s enrolled in your course, check users’ online statuses, send email messages, view shared locker files, and read their blogs if they have one.

Depending on your permissions, the Classlist tool enables you to add or remove course participants, change user roles, create new users, and import users from a TXT or CSV file. You can also use the options in the context menu beside each user’s name to view user progress and view group enrollments.

Accessing the Classlist Tool

The Classlist link can be found within the Course Admin link on the navigation bar.


Using the Classlist Tool

For the most up-to-date information on how to use the Classlist tool, please follow the links below to the Brightspace Help documentation site.

The Classlist tool is a convenient starting point for viewing information about the users in your course site. For example, you can check who’s online, view profiles, and check group enrollment.

You can also view the Enrollment Statistics, which provides a summary of course enrollments and withdrawals, as well as access the User Progress tool.

Below you will find some additional useful information about the Classlist tool pertaining to User Progress, Enrolment Statistics, and Class Engagement.

Viewing User Progress

Use this feature to view the progress of users enrolled in your courses. For more information on User Progress, see User Progress.

  1. On the Classlist page, click View Progress from the context menu (down-facing arrow) of the user you want to view

  2. To view progress on a specific progress indicator, click the indicator from the Reports List and the report will display under Report Details

  3. Click the expandable and collapsible links to expand or collapse the report detail


Viewing Classlist enrollment statistics

The Enrollment Statistics area provides a summary of course enrollments and withdrawals.

On the Classlist page, press the Enrolment Statistics button.


Class Engagement

The Class Engagement tool provides instructors with a quick overview of how engaged their students are with CourseLink. The tool helps instructors identify students who may be at risk, but it is not fool-proof. While it can inform an instructor who has or has not accessed their site or posted in discussions, it cannot inform an instructor how long a student spent on their site when it was accessed or what the quality of their discussion contribution may have been. This will still require a human eye and informed analysis.

To launch the Class Engagement tool, click Classlist on your navigation bar (or from Course Admin), then click the Class Engagement button.

 
  • To alert instructors about low class engagement, a notification tile indicates the number of learners who have not visited the course in the last 7 days. Clicking the tile filters the class list to display the learners who have not accessed the course during this period of time.

  • To view course progress at a glance, a bar chart tile displays the grade distribution within the course, with each bar representing a grade range. Clicking a bar filters the class list to display the learners in that grade range. To dismiss the filter, click Clear. NOTE: Since most course sites grade systems are set to automatically score empty grades as zero, the grades displayed are not reflective of their overall grade in the course to date, but rather of their current final grade.

  • Clear visual indicators display when filters are applied to metrics. For example, clicking a range in the grade distribution tile displays the Current grade filter with the specified grade range. Instructors can dismiss an active filter they are no longer interested in by clicking X in the filter.
    If multiple, discontinuous grade ranges are selected in the grade distribution tile, the Current grade filter displays without a grade range.

  • Use the search bar to filter the class list by learner name. You can type a name, user ID, or learner number.

  • A class list in table format displays the following information for each enrolled learner:

    • Name (full name and CourseLink username)

    • Current grade

    • Last visited (date of the last course visit)

    • Discussions (indicates the number of threads started by each user and the number of replies posted by each user)

  • Clicking a table entry displays more information in the Class Progress tool. For example, clicking a user’s name displays the Progress Summary in the Class Progress tool, which provides detailed information about course progress using tracking indicators such as quizzes, surveys, and login history


Email Classlist

  1. Select the Email Classlist button.

  2. Select the tab for the type of user that you would like to send the email
    to (either All, Students, Instructors, Teaching Assistants, or Guests).

  3. Click the Send Email button at the bottom of the page.

  4. A pop-up menu will appear where you can draft your email. The users
    selected in the previous step will be listed as Bcc recipients by default.

Image show the classlist with the Email Classlist option in a red box

5. Enter a title in the Subject line and add your email text under the Body section.

6. There is a an option to upload Attachments below the the Body section. Note that file sizes are limited to 10 MB.

7. Once you are ready to send your email, scroll back up to the top and click the Send button.


Classlist – View user pronouns next to names to further personalize learning

Classlist can now display users’ pronouns next to their names.

Users can choose whether to display their pronouns to other users in the Account Settings > Pronouns menu. They must check the Allow others to see my pronouns check box for their pronouns to display in Classlist.

Previously, the only location where pronouns displayed was in a user’s profile card.

When pronouns can be found in the classlist. It is to the right of the students name in a red box.

Classlist – Easily access and view sections for specific users

Instructors can now use the Classlist tool to view groups and sections. Previously, instructors could only view section enrollments using various filtering and sorting work flows or by searching within the Sections tool.

The view groups and sections dropbown option in a red box
 

Tutorial Videos


Classlist Tool FAQs


Related Resources and Programming:

Coming Soon!


Related Tools


Need More Help?

If you're still having trouble, please contact the CourseLink Support team for assistance.


Account Settings

What are Account Settings?

Account Settings allow you to customize and manage your personal CourseLink preferences such as your online status, CourseLink’s appearance, accessibility options, language and region, Discussions settings, and Email options.

Accessing your Account Settings

You can access your Account Settings by following the steps below:

  1. Click your name from the top-right of the CourseLink minibar

  2. Select Account Settings from the menu

  3. Use the tabs across the top of the page to view and edit options for your Account Settings, Discussions, and Email


Account Settings Options

Font Settings

Adjusting the font face and font size changes how the default font and size of text displays for the user. It does not affect images, documents, and other objects such as math equations.

Dialog Setting

The Show secondary window as options enable you to set secondary windows as pop-ups instead of dialog boxes. This setting helps screen readers and other assistive technologies separate the content of the secondary window from the main window. If you are using assistive technology such as a screen reader, we strongly recommend showing secondary windows as pop-ups.

HTML Editor Settings

Under this tab you can turn off the rich text editor. The HTML Editor has many additional rich text features that might be difficult to navigate with assistive technology. This option simplifies pages that have text fields, while still allowing you to include HTML content.

Video Settings

Select Optimize video presentation for programmatically-driven assistive technologies if you use assistive technology, such as a screen reader, to navigate the web. This option ensures that your assistive technology can detect embedded videos; it does not affect the accessibility of specific video players.

Locale & Language

Preferred Locale and Language:
Sets which locale to use for screen orientation, text, and graphics in the system. The options in the drop-down list correspond to the locale options available at your institution. Administrative staff and course designers can override your preferences for specific pages and courses.

Clock:
Sets whether time displays in 24-hour or 12-hour clock format.

First Day of the Week:
Sets which day appears first in your calendar.

Date:
Sets the display format of dates in the system.

Number Format:
Sets the display format of numbers in the system.

Percentage Format:
Sets the display format of percentages in the system.

Time Zone

Sets all dates that include times in CourseLink to correspond with the time zone you specify.

Signing In

Online Status sets whether you appear offline or online to other users when you are logged into the system.

Application Settings

Some applications (integrations) registered to your account can access the CourseLink LMS on your behalf. These setting allow you to manage and revoke that access.

For applications using OAuth 2.0, click the Manage applications registered with OAuth 2.0 link to view and control access from those applications.

For applications using ID Key Authorization, click the Revoke Access button to force all your applications or devices to renew their authentication. This ensures that others cannot, for example, access your grades or send emails as you if you lose a mobile device or discover that a linked application is compromised.


Account Settings - Discussions

Personal Settings

These settings will affect the default options for your account on CourseLink when interacting with the Discussions tool.

Display Settings

  • Always show the Discussions List pane

    • Selecting this option will pin the Discussions List pane in the View Topic and View Thread pages.

  • Display deleted posts

    • Selecting this option displays deleted posts when browsing topics. Note that the student role can only see their own deleted posts. An instructor role can see both their students’ deleted posts and their own deleted posts.

Both options are enabled by default.

Reply Settings

  • Include original post in reply

    • Selecting this option includes the original post by default when composing a reply.

This option is enabled by default.

Subscription Settings

  • When creating a new thread, subscribe to the thread by default

    • You will receive notifications when users reply to your thread based on your notification settings

This option is enabled by default.

Org Unit Settings

Default Rating Scheme

The option selected will automatically display in the Rate Posts drop-down list on the New Topic page and will automatically apply to imported course components. This setting only applies to users with roles that allow them to create new discussions topics (Instructors, TAs and Administrators).

Options include:

  • No Ratings

  • Five Star Rating Scheme

  • Up Vote/Down Vote Rating Scheme

  • Up Vote Only Rating Scheme

The default option is set to No Ratings. Any of these options may be selected at the time of creating a new discussion topic, regardless of which default setting is selected.


Account Settings - Email

Email Options

Send a copy of each outgoing message to [specified email address]

Sends a copy of all the emails you send to a specified address. Click the Change email address link to specify the address to which you want to send copies. Changing this address will change your external address for all mail sent from the Desire2Learn application.

Save a copy of each outgoing message to the Sent Mail folder

Saves a copy of your sent messages to a folder for convenient record-keeping.

display Options

Show external email addresses in the Address Book

External addresses for your system contacts will appear in the Address Book.


Account Setting - Set and view user pronouns

Users can now set their pronouns through Account Settings.

The account setting page highlighting the pronouns options

Figure: The area under Account Settings, where you can set your pronouns.

image displays a users profile card with the pronouns displayed.

Figure: A user profile card with the pronouns displayed.

Tutorial Videos


Account Settings FAQs


Related Resources and Programming

Coming soon!


Need More Help?

If you're still having trouble, please contact the CourseLink Support team for assistance.


Notifications

What is the Notifications tool?

The Notification tool allows a CourseLink user to receive messages about activity in their course sites. Users can receive a periodic summary of all new activity through email and/or receive instant notifications when certain events happen through email or SMS messages.

Notifications are available for activities involving several CourseLink tools such as:

  • Announcements

  • Content

  • Discussions

  • Dropbox

  • ePortfolio

  • Grades

  • Quizzes


Accessing the Notifications tool

Location of the Notifications link

The Notifications tool can be accessed after logging into CourseLink by following the steps below:

  1. From the CourseLink Minibar, select your name (top-right)

  2. Select Notifications from the menu


Using the Notifications tool

Setting up an email contact method

By default, email notifications are automatically sent to the email address associated with your CourseLink account. To change these settings, follow the steps below.

  1. Click on the Change your email settings link

  2. Select the Use custom email option and enter your email address in the text field

  3. Click Save

Contact Methods settings link for email


Setting up a mobile contact method

Notifications can be sent directly to your mobile phone. To associate a phone number with your CourseLink account, follow the steps outlined below.

  1. Click Register your mobile on the Notifications page

  2. Select your Country, your Mobile Carrier, and enter your Mobile Number in the form

  3. Click Save

  4. After you receive a registration confirmation code on your mobile device, enter it in the Confirmation Code field

  5. Click Confirm

Contact Methods settings link for Mobile


Subscribing to a summary of activity

Users may choose to receive a daily summary of all the activities in their courses by subscribing to a Summary of Activity that will be delivered to the user via email daily at a time of their choosing.

  1. On the Notifications page, select the delivery frequency you want from the How often? drop-down list

  2. Select when you want to receive your summary from the At what time? drop-down list

  3. Click Save

Summary of Activity options
 

Subscribing to instant notifications

Instant Notifications Options

Users can select to be notified immediately about any of the items listed under the Instant Notifications section by either email or SMS.

  1. On the Notifications page, enable instant notifications for specific course activity and updates by doing any of the following:

    • Select the Email check box to enable email notifications

    • Select the SMS check box to enable SMS notifications

  2. Click Save


Customize Notifications

Customization options are available if you want to include your grade value in Grades notifications, and if you want to allow past, future, and inactive course enrollments to send you notifications.

  1. Go to the Customize Notifications section on the Notifications page

  2. Select the check boxes beside the options you want to enable

Customize Notifications options
 

Excluding courses from notifications

You can exclude specific courses from sending you notifications.

  1. Click Manage my course exclusions in the Exclude Some Courses section on the Notifications page

  2. Click the  Exclude icon beside each course you want to exclude, or click Exclude All Courses to stop all course notifications. You can also use the Search field to find the course you want to exclude

  3. Click Close

  4. Click Save

Exclude Some Courses - manage exclusions link
 

Restoring excluded course notifications

  1. Click the Manage my course exclusions link in the Exclude Some Courses section on the Notifications page

  2. Click the  Restart notifications icon beside each course you want to receive notifications from, or click Restore excluded courses to restore all excluded courses. You can also use the Search field to find the course you want to restore

  3. Click Close

  4. Click Save

Manage Course Exclusions - Restore excluded courses options
 

When and why is it a good idea to use the Notifications tool?

The majority of the settings for notifications are intended for student use, however there are some that may be relevant to instructors as well.

Keeping on top of discussion activity in your course site

If you are actively engaging with your students via the discussions tool, you may want to subscribe to notifications for a specific forum, topic, or thread to be altered when another user posts, allowing you to reply promptly if required.

Even if you are not actively engaging with the students in the discussion, it may be beneficial to subscribe to certain discussions to keep tabs on how active they are and who is participating. It is recommended that if you are using it for this purpose that you choose the Summary of Activity option in your notification settings to receive a daily summary of all activities rather than individual messages for each post.

Site building with your TA or co-instructor

If you are creating a course site using the content tool with another user such as a TA, course coordinator, or co-instructor, then enabling the notifications for Content - content item created, or Content - content item updated will alert you when any new content items are added or modified. Please note that if the module under which the content is created is set to draft (hidden) no notification will be sent.


Tutorial Videos


Notifications FAQs


Related Resources and Programming

Coming Soon!


Related Tools

Classlist

Discussions

Announcements


Need More Help?

If you're still having trouble, please contact the CourseLink Support team for assistance.


Import / Export / Copy Components

What is the Import/Export/Copy Components tool?

The Import/Export/Copy Components tool lets you copy quizzes, content, grade items, discussion forums, assignments folders, and nearly every other type of component from another course or package. Copying components saves you from having to recreate your course materials and can significantly reduce the amount of work required to create or re-offer a course.

You can use the Import/Export/Copy Components tool to:

  • Reuse components from your previous course offerings.

  • Import material from an external source (other learning management systems, publisher resources, etc.)

  • Export materials in your course for use outside of CourseLink.

  • Copy components created by your peers into your own course offering.


Accessing the Import/Export/Copy Components tool

The Import/Export/Copy Components tool can be accessed by users with the Instruct-build-grade role (typically instructors of course sites supporting face-to-face course offerings) by following the steps below:

  1. Access the course site to which you you want to copy course components

  2. Click Course Admin on the navigation bar

  3. Select the Import/Export/Copy Components tool (if you have categories enabled, it will appear under the Site Resources heading)


Using the Import/Export/Copy Components tool

For the most up-to-date information on how to use the Import/Export/Copy Components tool, please see the following links to the Brightspace help documentation site:


Important Notes

  • This tool is only available to course instructors with the Instruct-build-grade role (typically those who are teaching courses that are delivered face-to-face)

  • Users will only be able to copy components from course sites where they also had the instruct-build-grade, or instruct-copy role

  • If you require access to another instructor’s course site to copy their components, please contact them directly and request that you be added to their site with the Instruct-copy role (CourseLink Support cannot grant you access to another instructor’s course site)

When and why to use Import/Export/Copy Components?

The import/Export/Copy Components tool can save instructors considerable time in a number of different scenarios.

Quickly setting up course sites for courses you’ve taught previously

If you teach a course where the content, assessment and delivery doesn’t change much from one semester to the next, then your entire course site can be setup in a matter of minutes by copying the content (lecture slides, reading materials, etc.), tools (Dropbox, Quizzes, Discussions, etc.), and assessment setup (Grades, Rubrics, etc).

During the copy process you can also use the Offset Dates feature to move all your previous due dates and release dates ahead a set number of days to save even more time!

Teaching a course that was taught by another instructor previously

If you’re teaching a course that was previously taught by another instructor and you are planning to use all or some of the same setup that they had previously, you may be able to get a head start by copying components from their site to yours.

Please keep in mind that a course site’s content and setup is considered the property of the instructor(s) who taught the course; you will need to contact them and request to be added to their site via the Classlist with the Instruct-copy role to be able to see their site as an option when copying components.

NOTE: If the previous instructor cannot be reached, CourseLink Support can grant that access with your department Chair’s direct consent.

import packages from publishers and vendors

Often a publisher or vendor you are working with will provide access to packages of content, quizzes or quiz questions that are compatible with a learning management system like CourseLink. It’s always a good idea to see if they have any Brightspace/D2L compatible packages available for download that could then be copied into your course site via the Import Components option.

Taking your course to go

If you are moving to another institution that is using a compatible learning management system, you can use the export option to download a copy of most of your course site’s components in a package that can be imported to the learning management system at your new institution. This works best when the other institution is also using the D2L Birhgtspace LMS, however it will also work to some degree with some other compatible learning management systems.

Tutorial Videos


Import/Export/Copy Components FAQs


Related Resources and Programming

Coming soon!


Related Tools

  • Turnitin

  • Grades

  • Rubrics

  • Groups

  • Content


Need More Help?

If you're still having trouble, please contact the CourseLink Support team for assistance.


I-CL-ContentOwen Wooding
Announcements

What is the Announcements tool?

The Announcement tool enables you to create news items that help communicate course updates, changes, and new information to your users quickly and effectively. Since Course Home is the first page that users often see when they log in or access their courses, the Announcement widget is a good area for displaying important information.

Announcement items appear in the Announcement widget, but CourseLink users can also receive instant notifications about postings through email and SMS (text messages). Please note that students do have the ability to turn off their announcement notifications as well as block them from specific course sites.

Accessing the Announcements Tool

The announcements tool is available via a widget on the default course home page of a CourseLink site. The options can be accessed from the widget using the context menu (down-facing arrow) to the right of the title.


It can also be accessed via the Course Admin link from a course navigation bar by following the steps below:

  1. Access the course site

  2. Select Course Admin on the navigation bar

  3. Select Announcements (if the tools are sorted by category, Announcements will appear under the Communication heading)


Using the Announcements tool

For the most up-to-date information on how to use the Announcement widget, please see the the following links on the Brightspace help documentation site.


When and why is it a good idea to use the Announcements tool?

The announcements tool is a great way to communicate and engage with students outside of class time.

That said, it is important to remember that students will only see an announcement if they access your course site or if they have opted to receive notifications via email or text, so it is best not to rely on the tool for any communication that all students should receive in a timely fashion. For communications such as that, it would be best to email the entire class via the Classlist tool.

Be careful not to over-use the announcements tool. Students accounts in CourseLink are set to receive email notifications for new announcements from all their course sites by default. If you are posting multiple announcements several times a day, students may become frustrated by the volume of emails and block your course site from their notifications reducing the likelihood that they will see your announcement.

Reminders

Throughout the semester it can be beneficial to post announcements concerning important dates such as assignment due dates, lab times, meeting locations for excursions, etc.

EncouragemenT and Directed Study

An announcement can be a great way to let the class know when you are impressed by their work. Similarly if after grading an assignment or seeing the results of a quiz you notice that the majority of the class is struggling with a specific concept or theory, an announcement can be a great way to direct students to supplemental materials to reinforce those concepts.

Making Connections with Relevant Current Events

In some disciplines current events can often intersect nicely with course materials and provide students with a real world example of how the material they are studying can be applied in real world situation. Creating an announcement to provide some context as well as a link to a news article or video can be a great way to engage students and encourage critical thinking.

Tutorial Videos


Announcements FAQs


Related Resources and Programming

Coming soon!


Related Tools

  • Turnitin

  • Grades

  • Rubrics

  • Groups

  • Content


Need More Help?

If you're still having trouble, please contact the CourseLink Support team for assistance.