Instructors: CourseLink Tools

The information on this page is intended for instructors using a CourseLink course site.

Posts in I-CL-Content
Zoom Transfer Tool

Introduction

OpenEd has developed a Zoom recording transfer tool to assist you with managing and transferring cloud recordings between your UofG Zoom Pro account and your UofG OneDrive account. The OpenEd Zoom cloud recording storage space is not unlimited, and we must regularly delete old recordings to allow for future recordings. The Zoom Transfer Tool makes the process of copying your Zoom cloud recordings to OneDrive simple and offers the option to automate the process for all future Zoom cloud recordings.


Signing In (SSO)

Please sign in via https://apps1.opened.uoguelph.ca/zoomtransfer/ with the UofG central account that matches the Zoom email account.

Note: You may have to end your existing SSO session and log in with the correct central account if you have multiple accounts.


Authorizing

The Zoom Transfer Tool allows users to transfer copies of all their recordings, transcripts, and chat files from the Zoom Cloud to their personal University of Guelph OneDrive account. Files are placed within a subfolder titled “Zoom Transfers” and organized by Topic Name, Meeting ID, and Date. Once recordings are transferred, users can access and share files as they would any other files in OneDrive.

Transfer requests are processed within 24 hours and an email confirmation is sent on completion. Cloud recordings are not removed as part of the transfer.

To use the Zoom Transfer Tool to copy recordings from your Zoom account(s) to your OneDrive account, you must first authorize the application to access and integrate with your OneDrive account by clicking the Authorize button.

Location of the Authorize button. A red arrow is pointing at the Authorize button.
 

Transfer Recordings

To transfer individual recordings, click the Transfer Recordings option on the menu bar or select the Search & Transfer Existing Recordings button.

Location of the Transfer Recordings link on the navigation bar. A red arrow is pointing at the Transfer Recordings button/link.

From the the Search Zoom Recordings page, follow the steps below:

  1. Select the Zoom account (almost all accounts will have one option).

  2. Select the recording start date (ideally, before the oldest recording).

  3. Select the recording end (today for the most recent recordings).

  4. Click the View Zoom Recordings button.

Locations of the options for Zoom Account, Recording Start Date, Recording End Date, and the View Zoom Recordings button. There is 4 red circles to the right of the respective steps with the numbers 1-4.

The Zoom Transfer Tool will find your Zoom cloud recordings and list them. Select (or deselect) the recordings that you would like transferred to OneDrive. Click Request Cloud Transfer.

Example of selecting specific Zoom cloud recordings. A red Arrow is pointing to the checkmark box to select the recoding.

You will then be sent the Transfer Log screen where you can review the recordings that will be transferred. If you wish to cancel the request, click the Cancel button under the Transfer Status column.

Location of the Cancel button.

The listed requests will be completed within 24 hours. We do not recommend deleting your Zoom cloud recordings until that process is complete and you have verified the files are on your OneDrive. Please see the Zoom Transfer Tool – Review Recordings in OneDrive page for more information on how to access your copied Zoom recordings.


Automate Zoom Transfers

The Zoom Transfer tool can automate the transfer of future recordings. Once the Automate Zoom Transfers option is enabled on a Zoom account, the Zoom Transfer Tool will transfer new Zoom cloud recordings to your OneDrive account as soon as they are processed and available on the Zoom cloud.

Once Automate Zoom Transfers is enabled, you will not need to return to the tool to manually transfer files unless a transfer fails. This will also ensure that you will have backups of any cloud recordings ahead of any future cloud storage space recovery performed by OpenEd.

The option to toggle Automate Zoom Transfers on can be located by clicking Automate Transfers in the navigation menu.

Location of the Automate Transfers link on the navigation menu. A red arrow is pointing to the option.

Automated Transfer requests are processed within 24 hours. An email confirmation will be sent when the copy process is complete. Please note that recordings are not removed from Zoom cloud as part of the transfer.

To enable:

  1. Click and enable the toggle beside the Zoom email address.

  2. Click the Save Automations button.

Example of how to enable automated Zoom transfers. A red circle with the number 1 is to the right of Zoom email address and a 2 in a red circle is to the right of the save automations.

You may return at any time to disable Automated Transfers.


Transfer Log

The Transfer Transaction Log allows you to review all active and completed transfer requests. Any recent requests will be displayed below the filter options.

You can filter between specific meeting/recording dates or between transfer dates, as well as by the Transfer Request Status.

Example of the available filter options in for the Transfer Log.

Note: Failed transfer requests will automatically retry only once within the following 24 hours. If the request fails a second time, the user may manually download the files from Zoom. Links to download any failed files from Zoom will appear in the error notification email. If you require any assistance, please contact CourseLink Support.


Deauthorize Application

If you have previously authorized the Zoom Transfer Tool to access your OneDrive account, you may choose to revoke this applications access to your OneDrive account, preventing further access. Deauthorizing the application will:

  • Prevent any pending requests from being transferred

  • Prevent any requests for future recordings to be transferred

  • Disable the option to Automate Transfers

  • Maintain access to the Transfer Logs of previous requests

If you deauthorize this application, you may reauthorize at any time.

Tutorial Videos


Need More Help?

If you're still having trouble, please contact the CourseLink Support team for assistance.


Ares

Ares

Ares allow instructors to make course materials available online for students. Anyone with Instructor access to a CourseLink course site, and an a set of Ares reserve materials can use this integration to add their Ares reserve list to CourseLink.

Ares CourseLink Integration

An Ares widget will appear on CourseLink for all courses, except DE.

Follow the 'import your reserve items' link located on your Ares course home page. You will be guided through an automated process that will require you to choose the way in which you want your Ares items to display in CourseLink. Ares can be formatted in the following ways:

  • Alphabetical

  • Sorted by tag

  • Separate list for each set of tagged items

Import Process

1. Click Import Your Reserve Items and the CourseLink login will be prompted.

2. Login via Single Sign-On.

3. The first time this option is used, you will be presented with confirmation. Check - Do not ask me again - and then click Continue.

4. The ‘Import Your Ares Resources into CourseLink’ selection screen will allow you to select specific options and identify course to which the Ares list will be imported.

5. Once you have made your selections, click on the Submit button to complete the process. You will be able to view the imported list in CourseLink.

The image shows the ARES import page for your CourseLink course site. It has a few fields like Ares Course Information and CourseLink Information.

Related Tools


Need More Help?

If you're still having trouble, please contact the CourseLink Support team for assistance.


Source: https://www.lib.uoguelph.ca/find/course-reserves-ares/import-ares-reserve-items-courselink

H5P

What is H5P?

H5P is a free and open-source content collaboration framework based on JavaScript. H5P is an abbreviation for HTML5 Package and aims to make it easy for everyone to create, share and reuse interactive HTML5 content.

Instructors can develop and share content using eCampusOntario H5P Studio to create interactive videos, presentations, quizzes and timelines.

Visit the H5P website and the eCampusOntario H5P Studio website for more information about its features.

Accounts and Access

H5P is available to instructors using your Guelph email address. Please contact open@ecampusontario.ca if you are unable to access your account.

Creating Content

H5P has over 40 content variations to choose from. Each type of content will have a demo and tutorial to help you create your content.

1. Navigate the menu bar and click Create.

2. Click Tour for a guided tour of the H5P features.

3. Once you have chosen your content type, click install.

A red circle is around the Content Demo button. A red circle is around the install button; the button has a blue arrow pointing down to the left of the text.

4. Click Use to get started on creating content.

A red circle is around the blue "Use" button.

Uploading Previously Created Content

If uploading content from the H5P website to the eCampusOntario website, download the H5P content and click reuse located at the bottom of the module.

1. Navigate the menu bar and click Create.

2. Click upload and choose the file on your computer.

A red circle is around the "Upload a file" button.

Embed H5P Content

H5P content can be embedded on your site using HTML.

1. Click Embed below the content you want to embed.

A red circle is around the "<> Embed" button.

2. Copy the code.

A red circle is around the embed code that you would copy and paste.

3. Click Text on the top right corner to switch to a textual editor and paste the code.

A red circle is around the "Text" button. A red circle is around the embed code text that you would copy and paste.

4. Click Visual on the top right corner to see the embedded content.

A red circle is around the "Visual" button.

5. Click Save.

Source: https://h5p.org/documentation/for-authors/the-basics

Licenses and Other Metadata

The catalogues on can be sorted by license on the eCampusOntario H5P Studio and must be applied when creating content. To add licenses or other metadata, click metadata beside the title. You will be able to add the source URL, authors, date and license extras in the metadata interface.

Additional Resources

Embedding Items


Need More Help?

If you're still having trouble, please contact the CourseLink Support team for assistance.


Embedding Items

An example of embedded video

What is the difference between "linking" and "embedding"?

When you click on a web link, often written in blue underlined text, you are taken to a different web page. That new web page may load in your current web browser window or open a new window or tab. You have probably created links yourself–in email messages or in documents–by copying and pasting URLs, also known as web addresses, so you can share web pages with others. Others can click one of you links, and then their web browser will display a web page you wanted to share.

In contrast, embedding is placing media, most often a video, directly into a web page. Examples are YouTube or Vimeo videos included within articles in online magazines or news sites. You can watch such videos directly from the articles' web pages without having to follow a link off to YouTube or Vimeo.

The URL or web address used to create a link looks similar to:

https://www.youtube.com/watch?v=jgh1Igj_uU0

An embed code is usually much longer than a URL and looks similar to:

<iframe width="560" height="315" src="https://www.youtube.com/embed/jgh1Igj_uU0" frameborder="0" allow="accelerometer; autoplay; encrypted-media; gyroscope; picture-in-picture" allowfullscreen></iframe>

If a media item on the Internet is embeddable, somewhere at the site of that media item you should be able to locate an option to “Share”, “Get HTML code”, or “Embed”. Using that option and following the directions that appear will provide you with either an embed code you can copy-and-paste yourself or a list of sites to which you can share the media automatically. Be aware though that sometimes the owner of a media item is the only one who can share it.

Some websites, like Facebook, are clever enough to recognize links to popular video sites, such as YouTube, and automatically convert video links into video embeds. And some sites, like YouTube, provide you with buttons to share media directly to other sites without requiring you to know, or copy, a URL or embed code. In both cases though, behind the scenes something is still creating and using an embed code to put the video on the site where you chose to share it.

Where can I add embed code in CourseLink?

You can add embed code to any tool that uses the WYSIWYG editor. Some examples of tools include: Content (HTML pages), Discussions, and Announcements.

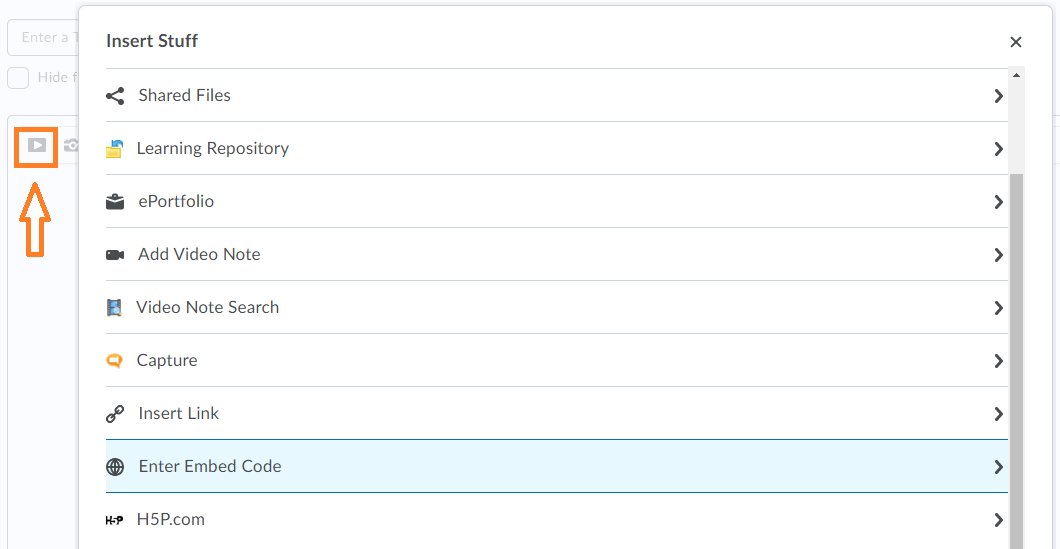
To embed something, click on the Insert Stuff button and scroll down to the Enter Embed Code option.

Selecting the Enter Embed Code option in CourseLink. A orange arrow is pointing to a orange box with the insert stuff button.


Need More Help?

If you're still having trouble, please contact the CourseLink Support team for assistance.


Source: https://wiki.millersville.edu/display/d2ldocs/Embedding+items

Content

What is the Content Tool?

The Content tool is used to access course materials, complete required activities, and monitor completion progress on topics contained within each course module.

Accessing the Content Tool

The Content tool is one of the links found on the default navigation bar of your CourseLink course site and can be accessed directly from that link.


When and why should you consider using the Content tool?

The Content tool enables instructors to post and organize course content so that the course syllabus, lecture notes, important dates, and information about course expectations display to users clearly.

Course materials you post in Content can include documents, images, media files, URL links, and activities (e.g. discussions, quizzes, surveys, self assessments, and Dropbox folders). You can add release conditions, grade items, and learning objectives for topics to ensure users navigate through course materials while fulfilling specific course requirements and learning expectations.

You can also monitor class and user progress as students work through course content. Completion tracking allows instructors to determine how content topics are set as “complete” (set automatically by the system or manually by the student). You can track these results on a student-by-student and class basis by viewing user progress and class progress in the User Progress tool.

I-CL-ContentGreg Sabatine
ePortfolio

What is the ePortfolio Tool?

The CourseLink ePortfolio is a personal portfolio tool for storing, organizing, reflecting on, and sharing items that represent your students' learning. They can include items such as documents, graphics, audio files, videos, presentations, and course work to demonstrate improvement or mastery in certain areas.

Students can control what items to include in their portfolio, how they are organized, and who they want to share them with. Students can share items with peers, mentors, or potential employers, and can give them permission to view items, edit items, see or add comments, and see or add assessments to receive feedback.

Accessing the ePortfolio Tool

The ePortfolio tool, unlike most other CourseLink tools, works at the organizational-level, not at the course-level. This means that the tool is available to all users across CourseLink, regardless of whether it is being used in the specific course sites to which a user has access.

Because ePortfolio is an organizational-level tool, it can be accessed from the My Home page of CourseLink, immediately after logging in.

An instructor may elect to add an additional link to the ePortfolio tool on their course navigation bar as well if they wish.


Using the ePortfolio Tool

For the most up-to-date information on how to use the ePortfolio tool, please follow the links below to the Brightspace Help documentation site.

Share items in courses

Integrating Brightspace ePortfolio with Content

Assessing Brightspace ePortfolio content in Brightspace Learning Environment


When and why should you consider using the ePortfolio tool? 

Tutorial Videos

Please note that while the videos below target learners/students, the tool can also be used by instructors in a similar capacity.


ePortfolio Tool FAQs


Related Resources and Programming:

Coming Soon!


Related Tools


Need More Help?

If you're still having trouble, please contact the CourseLink Support team for assistance.


Import / Export / Copy Components

What is the Import/Export/Copy Components tool?

The Import/Export/Copy Components tool lets you copy quizzes, content, grade items, discussion forums, assignments folders, and nearly every other type of component from another course or package. Copying components saves you from having to recreate your course materials and can significantly reduce the amount of work required to create or re-offer a course.

You can use the Import/Export/Copy Components tool to:

  • Reuse components from your previous course offerings.

  • Import material from an external source (other learning management systems, publisher resources, etc.)

  • Export materials in your course for use outside of CourseLink.

  • Copy components created by your peers into your own course offering.


Accessing the Import/Export/Copy Components tool

The Import/Export/Copy Components tool can be accessed by users with the Instruct-build-grade role (typically instructors of course sites supporting face-to-face course offerings) by following the steps below:

  1. Access the course site to which you you want to copy course components

  2. Click Course Admin on the navigation bar

  3. Select the Import/Export/Copy Components tool (if you have categories enabled, it will appear under the Site Resources heading)


Using the Import/Export/Copy Components tool

For the most up-to-date information on how to use the Import/Export/Copy Components tool, please see the following links to the Brightspace help documentation site:


Important Notes

  • This tool is only available to course instructors with the Instruct-build-grade role (typically those who are teaching courses that are delivered face-to-face)

  • Users will only be able to copy components from course sites where they also had the instruct-build-grade, or instruct-copy role

  • If you require access to another instructor’s course site to copy their components, please contact them directly and request that you be added to their site with the Instruct-copy role (CourseLink Support cannot grant you access to another instructor’s course site)

When and why to use Import/Export/Copy Components?

The import/Export/Copy Components tool can save instructors considerable time in a number of different scenarios.

Quickly setting up course sites for courses you’ve taught previously

If you teach a course where the content, assessment and delivery doesn’t change much from one semester to the next, then your entire course site can be setup in a matter of minutes by copying the content (lecture slides, reading materials, etc.), tools (Dropbox, Quizzes, Discussions, etc.), and assessment setup (Grades, Rubrics, etc).

During the copy process you can also use the Offset Dates feature to move all your previous due dates and release dates ahead a set number of days to save even more time!

Teaching a course that was taught by another instructor previously

If you’re teaching a course that was previously taught by another instructor and you are planning to use all or some of the same setup that they had previously, you may be able to get a head start by copying components from their site to yours.

Please keep in mind that a course site’s content and setup is considered the property of the instructor(s) who taught the course; you will need to contact them and request to be added to their site via the Classlist with the Instruct-copy role to be able to see their site as an option when copying components.

NOTE: If the previous instructor cannot be reached, CourseLink Support can grant that access with your department Chair’s direct consent.

import packages from publishers and vendors

Often a publisher or vendor you are working with will provide access to packages of content, quizzes or quiz questions that are compatible with a learning management system like CourseLink. It’s always a good idea to see if they have any Brightspace/D2L compatible packages available for download that could then be copied into your course site via the Import Components option.

Taking your course to go

If you are moving to another institution that is using a compatible learning management system, you can use the export option to download a copy of most of your course site’s components in a package that can be imported to the learning management system at your new institution. This works best when the other institution is also using the D2L Birhgtspace LMS, however it will also work to some degree with some other compatible learning management systems.

Tutorial Videos


Import/Export/Copy Components FAQs


Related Resources and Programming

Coming soon!


Related Tools

  • Turnitin

  • Grades

  • Rubrics

  • Groups

  • Content


Need More Help?

If you're still having trouble, please contact the CourseLink Support team for assistance.


I-CL-ContentOwen Wooding