Instructors: CourseLink Tools

The information on this page is intended for instructors using a CourseLink course site.

OpenEd Toolbox

What is the OpenEd Toolbox?

The OpenEd Toolbox application is a custom-built suite of CourseLink productivity tools. It began as an ad-hoc project to build and share additional custom utilities specifically for assisting CourseLink Support with common requests.

This application has now matured and is ready for release to our instructor community, allowing you to leverage the same tools safely and securely for your own course site(s).


User Tools

Bulk Enroll

The bulk enroll tool allows instructors and administrators to add guests to their courses in bulk. Choose the course and copy a CSV formatted list of usernames, email addresses, or student ID numbers into the User Data box and the tool will do the rest.

Note: This tool should only be used to enroll guests. Registered students are automatically added to and removed from CourseLink daily after courses are mapped using the Course Creation Tool.

Step 1: Information Form

Course: Select the specific course for enrollment. If you don’t see the course listed, you are either not enrolled in CourseLink or you can try clicking the Show Previous Offerings toggle.

Section: You have the option to enroll the guests in a particular section of the course. Selecting a section is optional.

Role: Although all roles are available in the dropdown list, the ability to add a guest with a specific role depends on your role in the selected CourseLink course. You will receive an error message if your course-level role is not able to enroll a guest with the role you have selected.

Auto Create Users: This option will automatically create CourseLink accounts for users who haven’t used CourseLink yet. Almost all staff, student, and instructor accounts are created through other processes, but some might not be included in those processes.

User Type: Only administrators are able to create external users. Instructors can add internal users who have an existing UofG / GH central account.

User Delimiter: Specifies how the list of guests in the User Data box is formatted.

Step 2: Confirmation and Enrollment

After submitting the form, the Bulk Enrollment processing screen displays the initial results of the request, including any existing errors. You can go back to correct errors at this point, otherwise click the Create and/or Enroll Users button to proceed. Any enrollment errors will be displayed as the requests are confirmed.

The Bulk Enroll tool confirmation screen showing a failed enrollment. The Failed enrollment is a red box with a red exclamation mark.

Figure: The Bulk Enroll tool confirmation screen showing a failed enrollment.


Group Tools

Group by Section

The Group by Section tool allows users to configure the creation of a new group category and groups that are restricted to students enrolled in the same section.

Step 1: Information Form

Course: Select the specific course. If you don’t see the course listed, you are either not enrolled in CourseLink or you can try clicking the Show Previous Offerings toggle.

Limit to Sections: Select the sections you would like to use to create your groups. A set of groups will be created for each section.

Create Category Name: Provide the Groups category name that you would like to see listed in CourseLink.

Users Per Group: Set the maximum number of users for each group. A new group will be created when the maximum is reached.

Identify Sections By: Determines the name of the groups. The group title will include the section code, course code, or both.

Enumerate Groups: Toggle on if you would like group numbers included in the group title.

Only Include: Select the roles you would like to include in the group formation.

Group Prefix: Include a word or phrase before the title for each group.

Step 2: Confirmation and Processing

After submitting the form, the Group by Section processing screen displays the results of the request. The number of required groups for each section will be displayed, as well as the group titles. Below, all students affected will be shown with their group enrollment listed. Click Process Groups to confirm and to create the groups in CourseLink.

The Group by Section confirmation screen results.

Figure: The Group by Section confirmation screen results.


Group List

The Group List tool retrieves a full list of groups and its members for a specified group category. All groups will be displayed in a single table. Results can be printed, copied, or exported to a CSV or Excel file.

Step 1: Information Form

Course: Select the specific course. If you don’t see the course listed, you are either not enrolled in CourseLink or you can try clicking the Show Previous Offerings toggle.

Group Category: Select the specific group category from the groups available in CourseLink.

Step 2: Group List Processing

The results of the request will be displayed showing the course, group category, and group count. The options to print, copy, or export to CSV or Excel will be available at the top of the results table.

An additional option to export a CSV file that can use the listed CourseLink groups to created pre-assigned Zoom breakout rooms can also be found as a button above the results table.

Location of the Export Pre-assigned Zoom Breakout Room File button highlighted by a red box around the button.
 

Group Rename

The Group Rename tool allows users to rename already configured groups that were created in CourseLink. The tool quickly renames groups with a prefix or sequential numbering.

Step 1: Information Form

Course: Select the specific course. If you don’t see the course listed, you are either not enrolled in CourseLink or you can try clicking the Show Previous Offerings toggle.

Group Category: Select the specific group category from groups available in CourseLink.

Add Prefix: Add a specific word or phrase to show up before the group titles.

Rename: Change the existing title of each group to a specific word or phrase.

Add Suffix: Add a specific word or phrase to show up after the group titles.

Renumber Sequentially: Add numbers after the group titles.
Use Leading Zeros: Start numbering with a zero (0), or multiple zeros (00).

Step 2: Group Rename Processing

The results of the request will be displayed showing the original names and the modified names. Click the Rename Groups button to proceed.


Create Predefined

The Create Predefined tool creates groups from a predefined list in a new or preexisting group category. It also provides the option to enroll users into those groups.

Step 1: Information Form

Course: Select the specific course. If you don’t see the course listed, you are either not enrolled in CourseLink or you can try clicking the Show Previous Offerings toggle.

Group Category: Select the specific group category from groups available in CourseLink or select Create new Category.

Group Data: Copy and paste the group names OR the group name and user identifier (username, student ID, email). Each group name or group name/user combo should be separated by a new line.

Delimiter: Choose the row delimiter for group name/user combo (comma or tab). If you are adding group names only, no delimiter is necessary.

Step 2: Create Predefined Groups Processing

The results of the request will be displayed showing the new group category (if selected) and the new group names. Individual users will be shown with their groups if you provided users. Click the Create Groups & Enroll Users button to proceed.


Enroll into Existing

The Enroll into Existing tool evenly distributes users of a specified role into existing groups of a selected course and group category. This process takes existing enrollments into consideration, without modifying them.

Step 1: Information Form

Course: Select the specific course. If you don’t see the course listed, you are either not enrolled in CourseLink or you can try clicking the Show Previous Offerings toggle.

Group Category: Select the specific group category from groups available in CourseLink.

Only Include: Select the roles to be included in the enrollment.

Exclude Users: Add the username of any users who should be excluded from the enrollment process.

User Distribution Order: Select the type of user distribution you would like to use as part of the enrollment process (Random, Last Name, First Name).

Fill Group Order: Select the type of group distribution you would like to use as part of the enrollment process (Random, By Group Name, By Creation Date).

Fill Partial Groups: Select the type of partial group filling you would like to use as part of the enrollment process (First, Last).

Step 2: Distribute Users into Existing Groups Processing

The results of the request will be displayed showing the table of existing groups and user enrollments. Any users originally enrolled in the groups will be shown with a check mark. Click the Enroll Users button to proceed with any new enrollments.

The Existing Groups tool confirmation showing a student already enrolled. This is confirmed by a circle with a checkmark.

Figure: The Enroll into Existing tool confirmation showing one student already enrolled.


Miscellaneous

Gradebook Column Copy

The Gradebook Column Copy tool copies the grade values from one CourseLink Grades column into another. Values can be copied between different grade item types (e.g., from a formula type to a numeric type) or between grade items of the same type.

Note: The destination grade item must be created in CourseLink prior to using this tool. The tool cannot create grade items.

Step 1: Information Form

Course: Select the specific course. If you don’t see the course listed, you are either not enrolled in CourseLink or you can try clicking the Show Previous Offerings toggle.

Only Include: Select the roles to be included in the grade copy.

Source Column: Select the source column to be used for the grade copy.

Destination Column: Select the destination column to be used for the grade copy. Any existing values in the column will be overwritten.

Step 2: Gradebook Column Copy Processing

The results of the request will be displayed showing a table of users and the current source and destination values. A warning will be displayed if the max points of each column does not match. Click the Copy Values button to proceed.


Training Course Report

The Training Course Report tool provides departmental administrators with access to their department’s completion tracking of the Environmental Health and Safety (EHS) CourseLink training courses. All departmental employees enrolled in the courses will be provided.

Please contact CourseLink to set up access if you are the administrator for your department.

Step 1: Information Form

Training Course: Select All or specific training courses from the list of available courses.

Department: Select All or a specific department from the list of available departments.

Staff: Select All or specific staff members from the list of available employees.

Step 2: Training Course Report Results

The results of the training courses will be displayed in table format. Use the buttons at the top of the table to Copy, export to CSV or Excel, or Print the results.

Yes – completed
No – not completed
N/A – not enrolled


CourseLink Quiz Printing

The CourseLink Quiz Printing tool allows an instructor to download a print ready and editable Word document of their CourseLink quiz and optionally generate an answer key.

The quiz printing tool does have some limitations that instructors should be aware of and consider when trying to print a quiz or when creating new quizzes.

The following question types are not supported:

  • Matching

  • Ordering

  • Arithmetic

  • Significant Figures

The following limitations will affect the download:

  • Question pools are not available.

  • Quiz section details such as title, text, and shuffle are not available.

  • Images attached to questions cannot be retrieved.

  • Quiz question order is not available. Questions will be grouped by section and displayed in the order that they are retrieved.

Tip: If your quiz uses question pools, it might be possible to make a copy of the quiz and remove the question pools by manually selecting the number of questions you would like on the printed quiz instead. Please contact CourseLink Support for assistance.

Step 1: Information Form

Course: Select the course site where the quiz resides (only courses with an instructor role will appear).

Quiz: Select the quiz you would like to print.

Generate Answer Key: Enable if you would like an answer key file generated as well.

Include Rich Text: Export the quiz with all HTML and other coding included in the file. Not enabling this option will create a file with plain text only.

Include Unsupported Question Types: For any unsupported questions, the system will add the question number, point value, bonus/mandatory indicators, question text, but will not include the question answer options.

Include Description: Include the quiz description at the top of the quiz file.

Include Header: Include the header information at the top of document.

Include Footer: Include the footer information at the bottom of the document.

Include Section Placeholders: If your quiz has sections, this feature will add a section placeholder in the quiz file that you can fill with information or copy from the original quiz.

Hide Question Hints: Hide the question hints found in ALL questions on the quiz.

Hide Bonus Question Indicators: Allows the instructor to hide the question type description showing that it’s a bonus question.

Hide Mandatory Question Indicators: Allows the instructor to hide the question type description showing that it’s a mandatory question.

Step 2: Download

After clicking Create File, and depending on your browser settings, the file save dialog will be presented where you can adjust the file name of the Word document or Zip file before saving to your device.

A Zip file will contain both the quiz document and quiz answer files (if selected).


PDF Splitter

This tool enables users to split a provided PDF file into multiple smaller PDFs, ensuring that each resulting PDF contains a target specified number of pages.

The PDF Splitter tool can be used by instructors when uploading scanned PDF files into Gradescope or by an SFC when uploading scanned paper questionnaires (SFQs) as a PDF into ABBYY.

Step 1: Information Form

Source PDF: Choose the PDF from your computer, OneDrive, or network drive.

Target page count per split: Select the maximum page count for each PDF file. The last file will contain any remaining pages.

Step 2: Download

After clicking the Submit button, and depending on your browser settings, the file save dialog will be presented where you can adjust the name of the Zip file before saving to your device.


Related Tools


Need More Help?

If you're still having trouble, please contact the CourseLink Support team for assistance.


Zoom Cloud Storage Retention

Overview

Zoom is a web-based conferencing service available to all instructors teaching during the current semester or for those users who have purchased a license with OpenEd. Users have access to the Zoom Cloud service when provided a Zoom Pro license.

Zoom Cloud is intended for temporary, non-archival storage, to be used during the current or immediate academic term. Instructors and staff are expected to assess those recordings on a routine basis and transfer their recordings to University-approved storage solutions like OneDrive.

Retention Period

Starting September 1, 2022, OpenEd will implement a one-year Zoom Cloud retention period. All Zoom recordings will be retained for one year, keeping up to the matching semester from the previous year. At the beginning of each subsequent semester, the next deletion cycle will begin.

All deleted files will be stored in the owner’s Trash for an additional 30 days. After the 30-day Trash timer expires, the recordings will be deleted permanently.

Examples of Zoom Cloud Recording Deletion Dates

Considerations

  • Be aware: Know the retention period so you can plan accordingly.

  • Backup or transfer your older recordings.

  • Consider automating backups using the Zoom Transfer Tool.

  • Want Reminders? You can enable an alert when recordings will be permanently deleted from Trash. Sign in to https://zoom.us, click Settings and select “Email Notification.” Enable “When the cloud recording is going to be permanently deleted from trash.”

Zoom Transfer Tool

OpenEd has developed a Zoom recording transfer tool to assist you with managing and transferring cloud recordings between your UofG Zoom Pro account and your UofG OneDrive account. The Zoom Transfer Tool makes the process of copying your Zoom cloud recordings to OneDrive simple and offers the option to automate the process for all future Zoom cloud recordings.

University Links Regarding Privacy and Retention

Privacy & Recording Virtual Lectures
Record Retention and Disposition Policy


Additional Resources

Zoom
Zoom Video Tutorials

Related Tools


Need More Help?

If you're still having trouble, please contact the CourseLink Support team for assistance.


Adding the Classlist to the NavBar

How to add ClassList to the Navbar

You can add the classlist back to the navbar. We removed it from all classes to protect the student from mass emails and security reasons. We recommend asking the students first if they want their email public to their peers first before updating the Navbar.   
 

The steps to add it back:  

1. Navigate to the CourseLink page.  

2. Move the mouse over the navbar.  

3. When 3 dots appear in a black box click on it. 

i. It will ask you to create a copy of the current Navbar if this is the first time you are editing it. Please click the blue button.

4. Click Edit this navbar  (or Customize this NavBar and then click yes - create a copy) 

5. Click Add Links  

6. Type Classlist  

7. Click Add  

8. Click save and close  


Tutorial Videos


Related Resources and Programming:

Coming Soon!


Related Tools


Need More Help?

If you're still having trouble, please contact the CourseLink Support team for assistance.


Guest UserNavBarFAQS
Classlist-linked Microsoft Security Groups

Classlist-linked Microsoft Security Group

Classlist-linked Microsoft Security Groups are the result of a collaborative project between CCS and OpenEd.

Microsoft Security Groups are used to grant and limit access to various to Microsoft resources such as files stored on OneDrive and Stream videos.

Through CourseLink’s Course Creation Tool, each course site may have a Microsoft Security Group created that will synchronize that course site’s Classlist tool with a Microsoft Security Group via an unique name (i.e. DEMO_1000_01_F22_654321) - a Classlist-linked Microsoft Security Group.

Once linked, the Classlist-linked Microsoft Security Group memberships are updated daily to ensure that any changes to a course site’s class list are also reflected in the corresponding Microsoft Security Group within a 24-hour window. This means that if a user (i.e., a student) is added to or removed from a CourseLink course site’s Classlist tool, they will also gain or lose access to the corresponding resource that was shared using that Classlist-linked Microsoft Security Group within 24 hours.

Please note that instructors and TAs that appear on a course site’s Classlist tool will be added to the security group within 24 hours of its creation. However, students will not be added to the security group until/unless the course site’s start date has passed. This allows instructors to setup shares using Classlist-linked Microsoft Security Groups ahead of class without worry that students will gain access before class begins.


Enabling the Classlist-linked Microsoft Security Group

Instructors can enable a Classlist-linked Microsoft Security Group when creating or updating a CourseLink course site using the CourseLink Course Creation Tool.

Once all the appropriate sections for the course site have been selected, instructors will be presented with the option to link the course site with a Microsoft Security Group.

The image shows you where to click to allow the Classlist-linked Microsoft Security Group to be created for the course. The text and check box is in a red box to indicate where to look.

Location of the create CLMSG option.

Selecting the Create and link Microsoft Security Group to this course site’s Classlist tool option will enable the creation and maintenance of a Classlist-linked Microsoft Security Group.


Locating and Identifying the Classlist-linked Microsoft Security Group

A unique security group name will be generated once the course site has been created or the existing course has been updated with Classlist-Linked Security Groups enabled.

Please note that the security group name will appear in the success message displayed once the course site creation process is complete.

The image shows where to look for the Microsoft security group text. There is a copy to clipboard button to the right of it.

Locations of the CLMSG code in the course creation success message.


You may also locate the security group name for any of your course sites with Classlist-linked Microsoft Security Groups enabled by using the Course Creation Tool’s Update Course option.

A page showing all CourseLink Courses you have access to as an instructor. It has red boxes around the Linked Security group text/code. There is a copy to clipboard button to the right.

Locations of the CLMSG codes on the update course sites section of the CourseLink Course Creation tool.


To uniquely identify and easily recognize each security group, its name is automatically generated as an amalgamation of the CourseLink Course Offering Code and the CourseLink course site’s OUID (OUIDs are the last 6 digits of a course site’s homepage URL). For example, if your course code is DEMO_1000_01_F22 and your course site’s OUID (org unit id) is 654321, then your Classlist-linked Microsoft Security Group name will be created as DEMO_1000_01_F22_654321.

NOTE: Once the security group is created, please do not attempt to modify your CourseLink Course Offering Code to alter the name, as the group name is locked on creation.

Once created, Classlist-linked Microsoft Security Groups are synchronized with the appropriate CourseLink site’s Classlist once nightly.  Security groups must be enabled before 7:00 pm to be included in the nightly update. Creation and processing of security group memberships are completed by 8:00 am the next day.


Using the Classlist-linked Microsoft Security Group

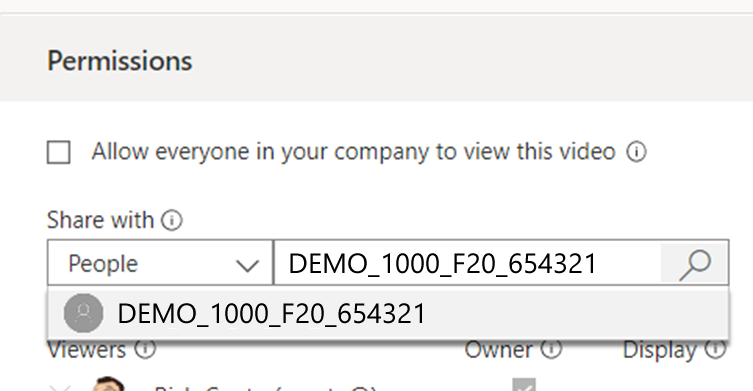
To assign a Classlist-linked Microsoft Security Group to a resource, such as an O365 document, or video stored on OneDrive, use the Share with option within the application and search for the group code that was generated in the CourseLink Course Creation tool (i.e., DEMO_1000_01_F22_654321).

Searching for the CLMSG in OneDrive’s share window. The image has a red box around the fields (who can view, a search bar...) important to the user.

Searching for the CLMSG in OneDrive’s share window.

NOTE: Security groups are considered People when searching and will not appear if you try to share using My Groups in Microsoft Stream.

An Image searching for the Classlist-linked Microsoft Security Group it can be seen in the dropdown menu.

After searching for the Classlist-linked Microsoft Security Group it can be seen in the dropdown menu.

Sharing to a Classlist-linked Microsoft Security Group can be done for each individual file or resource you wish to share with that group . If you are using OneDrive to store files you plan to share with your class, you may share specific files, or share a folder that contains multiple files with the corresponding Classlist-linked security group. If you share a folder with a security group, you can then simply copy a link for any file in that folder and share it with anyone on your CourseLink course site’s Classlist via the Content tool, email, etc. You will not need to share each file in that folder individually with the security group.

Please note that files in shared OneDrive folders inherit the permissions of the folder. This means that if the folder is shared to the security group and the allow editing option is enabled, then everyone on the course site’s class list (including students) will be able to edit and delete any shared files/documents from that folder. Any deleted files or folders will be placed in the owner’s OneDrive Recycle Bin and can be easily restored by the owner with all the original share permissions within 93 days . If the folder is shared to the security group with view only access, then everyone on the class list (including students) will not be able to edit or delete files/documents shared from that folder. The exception being the instructor, provided they are the owner of the file, or anyone that has been granted additional edit permissions by the file/resource owner.


Expiration of Access for Classlist-linked Microsoft Security Group Members

Security groups are cleared of non-instructor level members (students, TAs, guests, etc.) as of the access end date for the associated CourseLink course site. This means that when a user can no longer access a course site due to the passing of its end date, they will also lose access to any files or services (OneDrive documents, Stream videos, etc.) shared via the course site’s Classlist-linked Microsoft Security Group.

The files or services shared to that security group will be otherwise unaffected and the owner(s) will maintain access. Instructor-level users, those with the Instruct-facilitator or Instruct-build-grade roles on the Classlist tool, will also maintain membership to the security group and access to any shared files or resources after the access end date of the course site.


Deferred Students and Classlist-linked Microsoft Security Groups

If a student is granted deferred access to a CourseLink course site with the Deferred Student role within 18 months of its end date, they will be automatically re-added to the Classlist-linked Microsoft Security Group associated with that course site within 24 hours. This will restore access for deferred students to any resources previously shared for that course, provided they have not been deleted or had the share to the security group removed by their owner.

When a student’s deferred access to a course site ends, they are removed from the course site’s Classlist tool, which in turn will also automatically remove them from the associated Classlist-linked Microsoft Security Group within 24 hours.


Deletion of Classlist-linked Microsoft Security Groups

Classlist-linked Microsoft security groups are automatically deleted 18 months after their associated course site’s end date has passed.

Once the security group is deleted, any access provided to shared files or services through that group is also removed.

Only the Classlist-linked Microsoft security group is deleted. The files shared to that group are unaffected. The files/resources and any other sharing permissions associated with them are not impacted when the security group is deleted.

Please note that even after the security group is deleted, the owner’s files/resources on OneDrive may still indicate that the security group share exists, but the files/resources will no longer be shared as the security group no longer exists.


Need More Help?

If you're still having trouble, please contact the CourseLink Support team for assistance.


Rubric Tool FAQ
 

Rubrics – Copy and delete criteria groups

In response to client feedback about the New Dropbox Evaluation Experience, it is now possible to copy or delete a criteria group on a rubric. The delete option is only available if there is more than one criteria group.
Note: When a rubric with attached assessment items has submissions evaluated against it, the rubric is locked and can no longer be edited or deleted.  

After you click Copy Criteria Group, a new criteria group appears below the original criteria group. 

If you are using keyboard-only navigation, these options are available in the tab order after the criteria group name. Once the criteria group is copied using keyboard navigation, the keyboard focus moves to the new group’s name.

Note: Aligned learning outcomes are not copied when you copy a criteria group. Specific details of the evaluation criterion should be updated and re-aligned with specific learning outcomes which apply to the new criterion elements in the criteria group. 

Figure: The Copy and Delete options are available in the action menu on the Criteria Group header.Figure: The Copy and Delete options are available in the action menu on the Criteria Group header.

Figure: The Copy and Delete options are available in the action menu on the Criteria Group header.

Tutorial Videos


Need More Help?

If you're still having trouble, please contact the CourseLink Support team for assistance.


Guest UserRubric FAQ
Share OneDrive Video Files via CourseLink’s Content Tool

Introduction

As more video resources end up on OneDrive via Teams recordings and the OpenEd Zoom Transfer Tool, knowing how to share those video files via CourseLink’s Content tool with proper access permissions is an important skill. This guide will demonstrate the process for instructors to properly link and share a video file from OneDrive on CourseLink.


Getting Video Files on OneDrive

In some cases, such as recorded Teams meetings or Zoom meetings that have been transferred from the Zoom cloud to OneDrive using OpenEd’s Zoom Transfer Tool, video files will already be present on an instructor’s UofG OneDrive account.

If there is a need to add videos to OneDrive from other sources, we would recommend visiting the CCS OneDrive for Business support page or contacting their Help Desk (58888help@uoguelph.ca or x.58888).


Sharing Videos on OneDrive with a CourseLink Classlist

Any CourseLink site with a Classlist-linked Microsoft Security Group can easily share a OneDrive video file with any students who are on the CourseLink course site’s Classlist.

Please visit our Classlist-linked Microsoft Security Group page for information on how to enable and locate your linked security group code.

Once you have your security group code, please follow the steps below to share your OneDrive video file with any users that appear on your CourseLink course site’s Classlist.

  1. Open a web browser and access Webmail, then use the apps menu (9 squares) to access OneDrive.
Location of OneDrive link in Webmail. There is a 1 in a red circle with a red arrow pointing to 9 squares and a red 2 in a red circle with a red arrow pointing to a Link to OneDrive.
  1. Navigate to My files from the left menu.
Location of the My file link in OneDrive. An Arrow pointing to My Files.
  1. Locate the folder that contains the file you want to share and select it to show the file.
  2. Hover your mouse over the file to reveal and click on the Share icon that appears.
Location of the Share icon for a file in OneDrive. A red arrow pointing to the share button. The share button has a right angle where another arrow is coming from and going to the right.
  1. Enter the security group code for the course site you want to share the video on and wait for OneDrive to locate the matching code, then select it and click Copy link
Locations of: 1. Enter security group code. 2. Search result (to click). 3. Copy link icon
  1. Continue to the next section to learn how to use that copied link in CourseLink’s Content tool.

NOTE: Security groups refresh daily throughout the semester with updated student registrations. It may take up to 24 hours before a new student gains access to a resource shared via a Classlist-linked Microsoft Security Group.


Using the Content Tool to Link to a OneDrive Video File

Once the video file is shared with a course site’s Classlist-linked Microsoft Security Group, you may add it to your CourseLink course site by linking to the video from the Content tool. To do that, please follow the steps below:

  1. Navigate to CourseLink and access the course site where you want to add a link to a video file shared using a Classlist-linked Microsoft Security group on OneDrive.
  2. Select Content from the navigation bar.
  3. Select or create a module where you would like to add the video link.
Example of selecting a module via CourseLink’s Content tool. A red arrow pointing to an example module.
  1. On the right side of the screen, select the Upload/Create option, then select Create a Link.
Locations of the Upload/Create button and the Create a Link option. There is a 1 in a red circle with a red arrow pointing to the Upload/Create button and a 2 in a red circle with a red arrow pointing to Create a Link.
  1. Enter a title that describes the video’s content and paste in the URL from the link that was generated when the video was shared using the security group code (see the above section Sharing Videos on OneDrive with a CourseLink Classlist), then click Create.
Where to enter the title and url, as well as the location of the Create button. The Title and URL text boxes are in a red border box as well as the Create button in it's own red border box.

Note: Open as External Resource should be selected by default. If it is not, please ensure it is selected.

  1. The video will now be accessible by anyone on that course site’s Classlist via the Content tool.
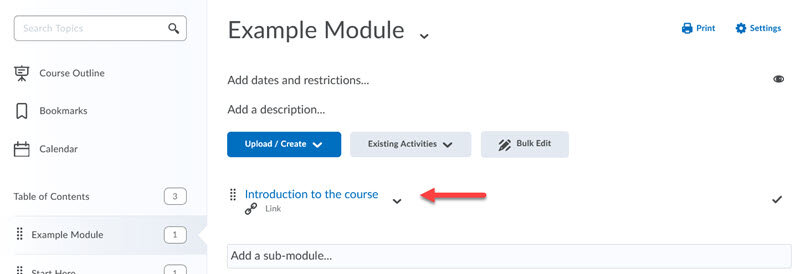
Example of the added video file link in the content module. It has a red arrow pointing to the "Introduction to the course" link in the Example module.

Need More Help?

If you're still having trouble, please contact the CourseLink Support team for assistance.


CourseLink Support
Zoom Transfer Tool – Review Recordings in OneDrive

Introduction

After authorizing the Zoom Transfer Tool and setting up your first transfer, you will be able to view the transferred files in OneDrive within 24 hours. We recommend reviewing these files after your first transfer, so you are familiar with the format and naming conventions.

Please note, these instructions are specific to reviewing your transferred Zoom recordings in OneDrive. For general support with OneDrive, please contact CCS.


Access OneDrive from Webmail

Login to your University of Guelph/Guelph-Humber email address within your preferred web browser.

Within your webmail, open the menu in the top left corner (9 squares) and select One Drive.

How to access OneDrive from WebMail.

Under My files, select Zoom Transfers.

Example of the Zoom Transfers folder on OneDrive.

Within the Zoom Transfers folder, you will find a folder matched to the corresponding Zoom account email with a maximum length of 40 characters.

Example of the Zoom account folder on OneDrive.

Recording Names

Within the Zoom account email folder is another set of folders. What you see will be determined by what you transferred. These folders group together everything from a specific Zoom meeting.

Example of folders for each Zoom recording on OneDrive.

All folders are named using the same convention:

  1. The meeting name with spaces replaced by underscores (_)

    • Academic_Continuity_-_Demo_Recording

  2. The Zoom meeting ID

    • 93583110235

  3. The date and time the meeting started, format: YYYYMMDD_HHMMSS

    • 20200826_125849

Within a meeting folder, you will find all the files associated with that meeting.

Example of the files listed pertaining to a single recordings located within its folder.

All files are named using the same convention:

  1. The meeting ID

    • 93583110235

  2. The date and time the recording started, format YYYYMMDD_HHMMSS

    • 20200826_130228

  3. The file type represented as a 2-digit code

    • 02

  4. The appropriate file extension

    • .MP4

Please note, the name inside the folder does not include the meeting name.

Files can be identified using the file type and extension information. Depending on what you capture, you may see different file types. The mostly likely files to find based on the default cloud recording settings are bolded below.

Type

Code

Extension

Shared screen with speaker view

01

JSON

Shared screen with speaker view (CC) video

01

MP4

Shared screen with speaker view (CC) captions

01

VTT

Shared screen with speaker view (default)

02

MP4

Shared screen with gallery view

03

MP4

Speaker view

04

MP4

Gallery view

05

MP4

Shared screen

06

MP4

Audio only

07

M4A

Audio transcript

08

VTT

Chat file

09

TXT

Active speaker view

10

MP4

Poll results

1


Need More Help?

If you're still having trouble, please contact the CourseLink Support team for assistance.


CourseLink Support
Zoom Transfer Tool

Introduction

OpenEd has developed a Zoom recording transfer tool to assist you with managing and transferring cloud recordings between your UofG Zoom Pro account and your UofG OneDrive account. The OpenEd Zoom cloud recording storage space is not unlimited, and we must regularly delete old recordings to allow for future recordings. The Zoom Transfer Tool makes the process of copying your Zoom cloud recordings to OneDrive simple and offers the option to automate the process for all future Zoom cloud recordings.


Signing In (SSO)

Please sign in via https://apps1.opened.uoguelph.ca/zoomtransfer/ with the UofG central account that matches the Zoom email account.

Note: You may have to end your existing SSO session and log in with the correct central account if you have multiple accounts.


Authorizing

The Zoom Transfer Tool allows users to transfer copies of all their recordings, transcripts, and chat files from the Zoom Cloud to their personal University of Guelph OneDrive account. Files are placed within a subfolder titled “Zoom Transfers” and organized by Topic Name, Meeting ID, and Date. Once recordings are transferred, users can access and share files as they would any other files in OneDrive.

Transfer requests are processed within 24 hours and an email confirmation is sent on completion. Cloud recordings are not removed as part of the transfer.

To use the Zoom Transfer Tool to copy recordings from your Zoom account(s) to your OneDrive account, you must first authorize the application to access and integrate with your OneDrive account by clicking the Authorize button.

Location of the Authorize button. A red arrow is pointing at the Authorize button.
 

Transfer Recordings

To transfer individual recordings, click the Transfer Recordings option on the menu bar or select the Search & Transfer Existing Recordings button.

Location of the Transfer Recordings link on the navigation bar. A red arrow is pointing at the Transfer Recordings button/link.

From the the Search Zoom Recordings page, follow the steps below:

  1. Select the Zoom account (almost all accounts will have one option).

  2. Select the recording start date (ideally, before the oldest recording).

  3. Select the recording end (today for the most recent recordings).

  4. Click the View Zoom Recordings button.

Locations of the options for Zoom Account, Recording Start Date, Recording End Date, and the View Zoom Recordings button. There is 4 red circles to the right of the respective steps with the numbers 1-4.

The Zoom Transfer Tool will find your Zoom cloud recordings and list them. Select (or deselect) the recordings that you would like transferred to OneDrive. Click Request Cloud Transfer.

Example of selecting specific Zoom cloud recordings. A red Arrow is pointing to the checkmark box to select the recoding.

You will then be sent the Transfer Log screen where you can review the recordings that will be transferred. If you wish to cancel the request, click the Cancel button under the Transfer Status column.

Location of the Cancel button.

The listed requests will be completed within 24 hours. We do not recommend deleting your Zoom cloud recordings until that process is complete and you have verified the files are on your OneDrive. Please see the Zoom Transfer Tool – Review Recordings in OneDrive page for more information on how to access your copied Zoom recordings.


Automate Zoom Transfers

The Zoom Transfer tool can automate the transfer of future recordings. Once the Automate Zoom Transfers option is enabled on a Zoom account, the Zoom Transfer Tool will transfer new Zoom cloud recordings to your OneDrive account as soon as they are processed and available on the Zoom cloud.

Once Automate Zoom Transfers is enabled, you will not need to return to the tool to manually transfer files unless a transfer fails. This will also ensure that you will have backups of any cloud recordings ahead of any future cloud storage space recovery performed by OpenEd.

The option to toggle Automate Zoom Transfers on can be located by clicking Automate Transfers in the navigation menu.

Location of the Automate Transfers link on the navigation menu. A red arrow is pointing to the option.

Automated Transfer requests are processed within 24 hours. An email confirmation will be sent when the copy process is complete. Please note that recordings are not removed from Zoom cloud as part of the transfer.

To enable:

  1. Click and enable the toggle beside the Zoom email address.

  2. Click the Save Automations button.

Example of how to enable automated Zoom transfers. A red circle with the number 1 is to the right of Zoom email address and a 2 in a red circle is to the right of the save automations.

You may return at any time to disable Automated Transfers.


Transfer Log

The Transfer Transaction Log allows you to review all active and completed transfer requests. Any recent requests will be displayed below the filter options.

You can filter between specific meeting/recording dates or between transfer dates, as well as by the Transfer Request Status.

Example of the available filter options in for the Transfer Log.

Note: Failed transfer requests will automatically retry only once within the following 24 hours. If the request fails a second time, the user may manually download the files from Zoom. Links to download any failed files from Zoom will appear in the error notification email. If you require any assistance, please contact CourseLink Support.


Deauthorize Application

If you have previously authorized the Zoom Transfer Tool to access your OneDrive account, you may choose to revoke this applications access to your OneDrive account, preventing further access. Deauthorizing the application will:

  • Prevent any pending requests from being transferred

  • Prevent any requests for future recordings to be transferred

  • Disable the option to Automate Transfers

  • Maintain access to the Transfer Logs of previous requests

If you deauthorize this application, you may reauthorize at any time.

Tutorial Videos


Need More Help?

If you're still having trouble, please contact the CourseLink Support team for assistance.


Accommodations Tool

This feature enables instructors to grant learners accommodations through the Classlist tool. The Accommodation options currently available include: more time to complete quizzes at the course level and the ability to bypass right-click restrictions in quizzes. The right-click restriction in quizzes is the ability for learners to right-click in the quiz while taking the quiz and is important for users that may need access to accessibility tools like screen readers.

Please note: this tool has been enabled for the Guelph-Humber campus. Although University of Guelph users can use it, the Automated Quiz Extension Tool is the recommended tool for U of G students.

Figure: The new Edit Accommodations dialog box. It has setting allowing to modify the time limit.

Figure: The new Edit Accommodations dialog box


How it works:

Once granted, these accommodations apply to all quiz activities in a course for that learner. The additional time can be applied in terms of quiz time multipliers (for example, 1.5x quiz time) or extra time in minutes (for example, an additional 30 minutes) on every quiz in a course.

An icon appears next to the learner’s name in the Classlist to indicate that the learner has an accommodation.

Instructors can filter the Classlist by Accommodations using the advanced search options.

For learners - an icon appears next to learners’ own names to indicate they have an accommodation. To view accommodation details, learners can click My Accommodations from their learner context menu.

Quiz-specific special access can overwrite an accommodation for any user on a quiz-by-quiz basis. When you overwrite an accommodation using Special Access and then click Save, a warning describing the impact of overwriting an accommodation appears.


Steps to Add:

  1. Navigate to the Classlist in Course Admin.

  2. Locate the student you wish to provide accommodations for.

  3. Click the arrow to the right of their name.

  4. In the dropdown menu, select Edit Accommodations.

  5. Select “Modify Time Limit”

  6. Put their modifer in and click “Save”

The edit Accommodations button underlined with a red line


Need More Help?

If you're still having trouble, please contact the CourseLink Support team for assistance.


Hiding Exam Grades

Publishing Midterm and Final Exam grades when you want the results hidden from students

You can publish quiz grades to the Grades page without students receiving their mark or feedback. We’ll use a Final Exam quiz as the example below, but the same principle can be applied to any quiz, midterm, or Dropbox assignment.

First, hide the corresponding grade item so students will not see their grade in the Grades page. Navigate to Grades. Click the dropdown arrow beside the corresponding Final Exam grade item and select “Hide from Users".

Check the Submission Views tab to ensure students will not see their marks on the Quizzes page. Navigate to Quizzes. Click the Final Exam quiz to edit. Navigate to Submission Views. Click the “Default View” link. Under View Details, ensure the checkbox beside “Show attempt score and overall attempt score” is unchecked. Save to return to the Submission Views tab, then Save and Close.

Check the Assessment tab of the quiz to verify that the Grade Item is selected and Auto Export to Grades is selected.

Now, you can safely publish the grades without students seeing their mark. Navigate to Quizzes. Click the dropdown arrow beside the Final Exam quiz and choose “Grade”. Ensure that you have the maximum number of users displayed per page by selecting “200 per page” at the bottom right. Use the checkbox at the top-left of the grid to select all students and exam attempts. Click “Publish Feedback”. It is safe to ignore the warning message “Users will receive feedback on publishing. Do you want to continue?” if you have followed the steps above. Click “Yes”. Your grades have now been sent to the Grades page without students seeing their mark. If you have multiple pages of students in your class (200+), repeat these steps for each page of students.

Troubleshooting

If the above steps do not cause the quiz grades to be sent to the Grades page, the Quiz is likely not connected to a corresponding grade item. Navigate to Quizzes and click the Final Exam quiz to edit. Choose the Assessment tab. From the Grade Item dropdown menu, choose the grade item that corresponds with the Final Exam. If no grade item exists, proceed to the Grades tool to create and hide the quiz column.

Getting started

MANAGING GRADES

PREPARING FINAL GRADES

Please refer to the section on Final Grades Download Tool.

Automated Quiz Extension Tool

OpenEd, in partnership with SAS, has developed an automated quiz extension tool that will automatically apply a quiz extension using Special Access in quizzes for students registered with SAS.

Please Note: Guelph-Humber courses should use the Accommodations tool. The Automated Quiz Extension Tool is only available for students registered with SAS.

Instructor or TA Responsibilities:

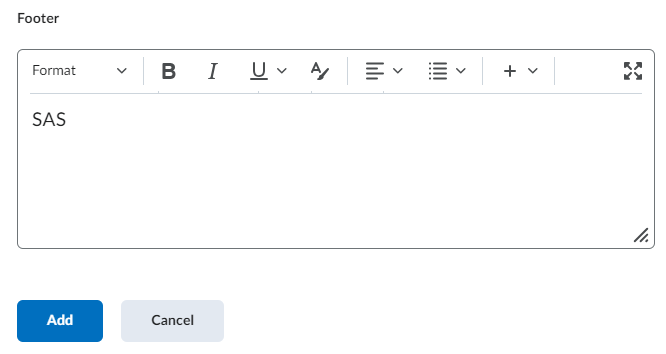
To enable the Automated Quiz Extension Tool, instructors or TAs must add the word SAS to the Page Footer located under the Timing and Display tab of each quiz. Once the quiz is saved with this change, it will be enabled for automated SAS quiz extensions.

That’s it!

A text field with SAS written in it
The Footer can be found in the Manage Header and Footer settings under the Timing and Display dropdown when using the new quiz experience.

The Footer can be found in the Manage Header and Footer settings under the Timing and Display dropdown when using the new quiz experience.


How it works:

When the word SAS is added to the quiz footer, the automated tool will flag the quiz as being enabled for any quiz extensions in that course site.

A daily feed from SAS, containing the most up-to-date list of SAS student extensions, syncs with CourseLink in the evening (at approximately 10:00 PM) and applies the required special access conditions to any quizzes in a course site that is flagged as enabled.

If you enable a quiz during the day, the feed will update those quizzes during the evening sync.

Any students with straight time added (+15 or +30 minutes) will only have the time applied if the original enforced time on a quiz is 30 minutes or more. Straight time is used to provide the student with enough time to take medications, eat something, or other reasons depending on the medical condition.

Any multipliers (1.5x or 2.0x) will apply regardless of enforced time.


Why not do it automatically for all quizzes?

There are several reasons:

  1. Flexibility

  2. Instructor discretion

  3. Universal design

We hope that this simplified method of adding the word SAS only once to each quiz far outweighs the previous method that required each individual SAS student’s special access condition to be set in each quiz in each course site.


Manually Adding or Adjusting Special Access Dates:

If you are granting or adjusting special access in a quiz for a student with SAS conditions that differ from the regular quiz dates, your changes will not be overwritten. Please be aware that the sync will retain the adjusted dates on any special access records that have been manually adjusted by the instructor or TA, including the records that already exist in the system. The instructor or TA is responsible for maintaining those conditions going forward.


Automatically Adjusting Late Evening Start Times:

Students writing late evening quizzes that will potentially take them past 10:00 PM will have the start time automatically adjusted forward to ensure that the students finish writing the quiz by 10:00 PM.

For example, if a student has a 2.0x extension on a 2 hour exam and the quiz starts at 7:OO PM, the tool will adjust the start time to 6:00 PM to ensure the entire 4 hour time limit can be completed by 10:00 PM.


Deferred Exams:

The tool sync will only update in the current semester. Any students with SAS accommodations for deferred exams from previous semesters must be added manually in the previous course using Special Access in the quiz.


Please Note: Guelph-Humber courses should use the Accommodations tool.


Need More Help?

If you're still having trouble, please contact the CourseLink Support team for assistance.


Ares

Ares

Ares allow instructors to make course materials available online for students. Anyone with Instructor access to a CourseLink course site, and an a set of Ares reserve materials can use this integration to add their Ares reserve list to CourseLink.

Ares CourseLink Integration

An Ares widget will appear on CourseLink for all courses, except DE.

Follow the 'import your reserve items' link located on your Ares course home page. You will be guided through an automated process that will require you to choose the way in which you want your Ares items to display in CourseLink. Ares can be formatted in the following ways:

  • Alphabetical

  • Sorted by tag

  • Separate list for each set of tagged items

Import Process

1. Click Import Your Reserve Items and the CourseLink login will be prompted.

2. Login via Single Sign-On.

3. The first time this option is used, you will be presented with confirmation. Check - Do not ask me again - and then click Continue.

4. The ‘Import Your Ares Resources into CourseLink’ selection screen will allow you to select specific options and identify course to which the Ares list will be imported.

5. Once you have made your selections, click on the Submit button to complete the process. You will be able to view the imported list in CourseLink.

The image shows the ARES import page for your CourseLink course site. It has a few fields like Ares Course Information and CourseLink Information.

Related Tools


Need More Help?

If you're still having trouble, please contact the CourseLink Support team for assistance.


Source: https://www.lib.uoguelph.ca/find/course-reserves-ares/import-ares-reserve-items-courselink

H5P

What is H5P?

H5P is a free and open-source content collaboration framework based on JavaScript. H5P is an abbreviation for HTML5 Package and aims to make it easy for everyone to create, share and reuse interactive HTML5 content.

Instructors can develop and share content using eCampusOntario H5P Studio to create interactive videos, presentations, quizzes and timelines.

Visit the H5P website and the eCampusOntario H5P Studio website for more information about its features.

Accounts and Access

H5P is available to instructors using your Guelph email address. Please contact open@ecampusontario.ca if you are unable to access your account.

Creating Content

H5P has over 40 content variations to choose from. Each type of content will have a demo and tutorial to help you create your content.

1. Navigate the menu bar and click Create.

2. Click Tour for a guided tour of the H5P features.

3. Once you have chosen your content type, click install.

A red circle is around the Content Demo button. A red circle is around the install button; the button has a blue arrow pointing down to the left of the text.

4. Click Use to get started on creating content.

A red circle is around the blue "Use" button.

Uploading Previously Created Content

If uploading content from the H5P website to the eCampusOntario website, download the H5P content and click reuse located at the bottom of the module.

1. Navigate the menu bar and click Create.

2. Click upload and choose the file on your computer.

A red circle is around the "Upload a file" button.

Embed H5P Content

H5P content can be embedded on your site using HTML.

1. Click Embed below the content you want to embed.

A red circle is around the "<> Embed" button.

2. Copy the code.

A red circle is around the embed code that you would copy and paste.

3. Click Text on the top right corner to switch to a textual editor and paste the code.

A red circle is around the "Text" button. A red circle is around the embed code text that you would copy and paste.

4. Click Visual on the top right corner to see the embedded content.

A red circle is around the "Visual" button.

5. Click Save.

Source: https://h5p.org/documentation/for-authors/the-basics

Licenses and Other Metadata

The catalogues on can be sorted by license on the eCampusOntario H5P Studio and must be applied when creating content. To add licenses or other metadata, click metadata beside the title. You will be able to add the source URL, authors, date and license extras in the metadata interface.

Additional Resources

Embedding Items


Need More Help?

If you're still having trouble, please contact the CourseLink Support team for assistance.


Zoom

What is Zoom?

Zoom is a video conferencing tool that allows users to interact with others in different locations by streaming through audio and video. Instructors can use Zoom to deliver online lectures to students in real time. Zoom is accessible from a tablet, a smartphone, or a computer. Users have the ability to share their screen, use a camera or microphone, use a text-based chat, participate in a breakout room and a variety of other tools to encourage active learning. Zoom will help to actively engage students through virtual teaching and learning.

If you will be teaching your course remotely, you will want to use Zoom Meetings in your CourseLink course.

Visit the Zoom website for information about its features.

Zoom Pro License

A Zoom Pro License can be used by instructors for teaching purposes. To obtain a Zoom Pro License and activate your Zoom account, contact CourseLink Technical Support.

Enabling Zoom on CourseLink

1. Navigate to the Content area of CourseLink and type Zoom in Add a module. Save by clicking Enter.

A red circle is around the number one which is to the right of the "Add a module" button.

2. Enter the Zoom module. Add a direct link to Zoom by opening the Existing Activities dropdown and select External Learning Tools.

A red circle is around the number two which is to the left of the "External Learning Tools" dropdown menu option.

3. From the list of available LTI Links, select Zoom. This will allow you and your students to access Zoom meetings through your CourseLink course.

Note: If you have a Zoom account linked with a personal email account, it will not upgrade to the PRO version or integrate with CourseLink.

A red circle is around the number 3 which is to the right of the Zoom link/button.

How to Create a Zoom Meeting

Once you have created an account, you can return to your CourseLink course.

1. Enter the Zoom module and click on the Zoom tool. Click Schedule a New Meeting.

Note: The first time you use Zoom, you may have to “allow” Zoom to integrate with your course.

A red arrow is pointing to the "Schedule a  New Meeting" button. This step is indicated by a red circle is around the number one which is above the button.

2. Enter meeting topic. This will be prepopulated with your course name and code.

3. Select the starting date, time, and duration of your meeting.

4. Decide if you want to schedule a Recurring meeting and select the dates for meetings as well as the ending date.

Note: If you do not select Recurring meeting, you will need to individually enter each meeting time. If you choose recurring meeting, the same meeting ID will be used for all meetings.

A red circle is around the number two which is to the left of the topic text. A red circle is around the 3 one which is to the left of the timing options. A red circle is around the number 4 which is to the right of the recurrence option.

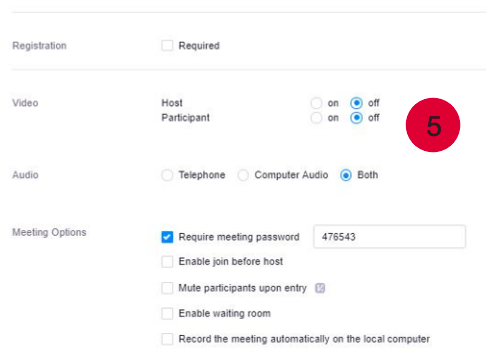
5. After you schedule the meeting, you will see more options for your meeting. They are explained here:

  • Registration: This is not needed. This requires students to register for the class ahead of time. Leave this unchecked.

  • Video: If you would like yourself and/or students to be able to activate their camera, you can indicate that here. During the live session you will have the ability to toggle cameras on/off.

  • Audio: “Telephone” means microphone here. You will likely want your mic activated, and possibly your computer audio. Check both.

  • Meeting options: You have the ability to Mute participants upon entry and Record the meeting automatically. You may also want to check more of these boxes.

A red circle is around the number 5 which is to the left of the schedule a meeting options.

6. Click save when you are finished. Go back to the Zoom module, and you will see all of your scheduled meetings displayed.

Additional Resources

Zoom Cloud Storage Retention
Zoom Video Tutorials

Related Tools


Need More Help?

If you're still having trouble, please contact the CourseLink Support team for assistance.


Course Creation Tool

What is the Course Creation Tool?

The Course Creation tool has two ways in which you can setup a course:

  1. Create a CourseLink course site is used if you are creating a new CourseLink for the first time.

  2. Update a CourseLink course site is used if you have already created a CourseLink site for your course, but need to add or remove sections (E.g. adding an auditing section).

Review the sections and courses available through WebAdvisor before creating a CourseLink course site.


Cross-listed courses

Cross-listed courses are CourseLink sites with more than one course number or department code. To setup a cross-listed course please contact CourseLink Support with your request at courselink@uoguelph.ca

If you require a Guelph-Humber course site, please contact your Faculty Support Officer.


Accessing the Course Creation Tool

Instructors can access the Course Creation Tool at the following url: https://cr.opened.uoguelph.ca/Instructor


Using the Course Creation Tool

Create a Course

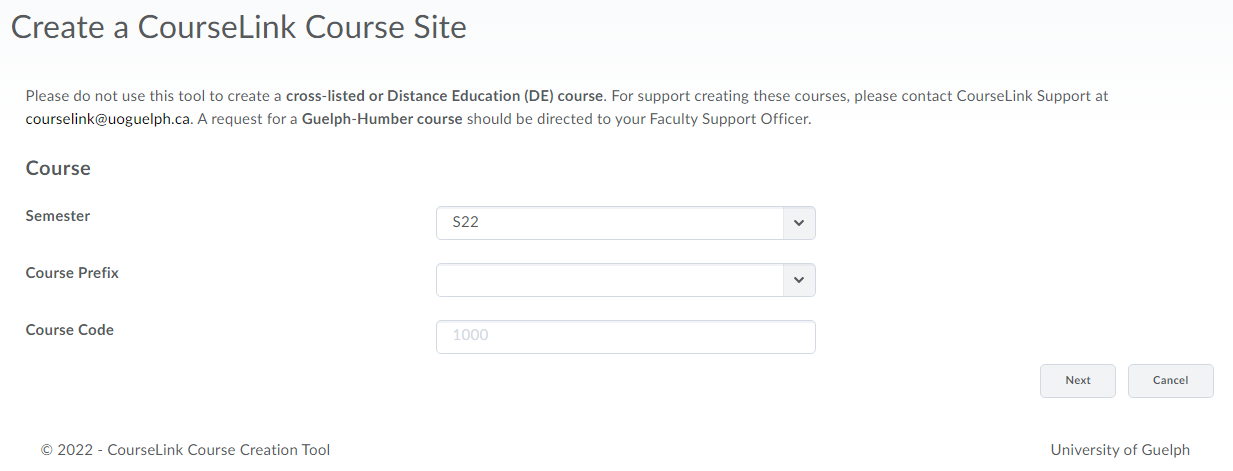
(1) Click “Create a CourseLink course site”.

(2) Select the semester, code prefix and enter course code.

(3) Click the ‘Next’ button

The Create a CourseLink Course Site with a few options like Semester, Course Prefix, and Course Code.

Map Sections

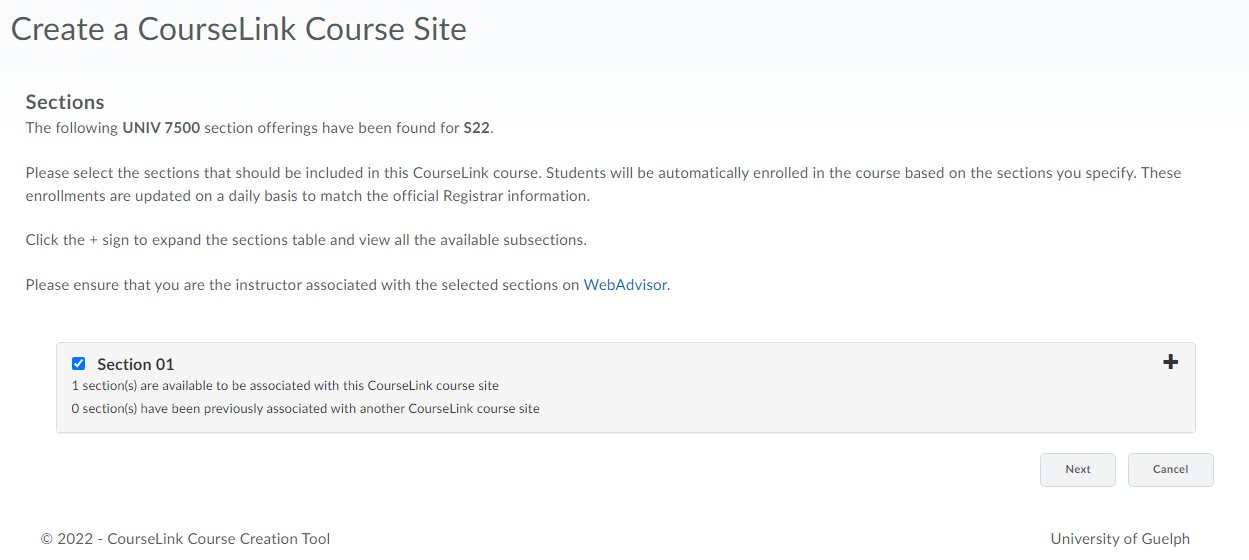
(4) Select the check box next to the sections that you would like to add to your CourseLink site.

(5) Click the ‘Next’ button on the bottom right.

The Create a CourseLink Course Site page with Section 01 selected.
 

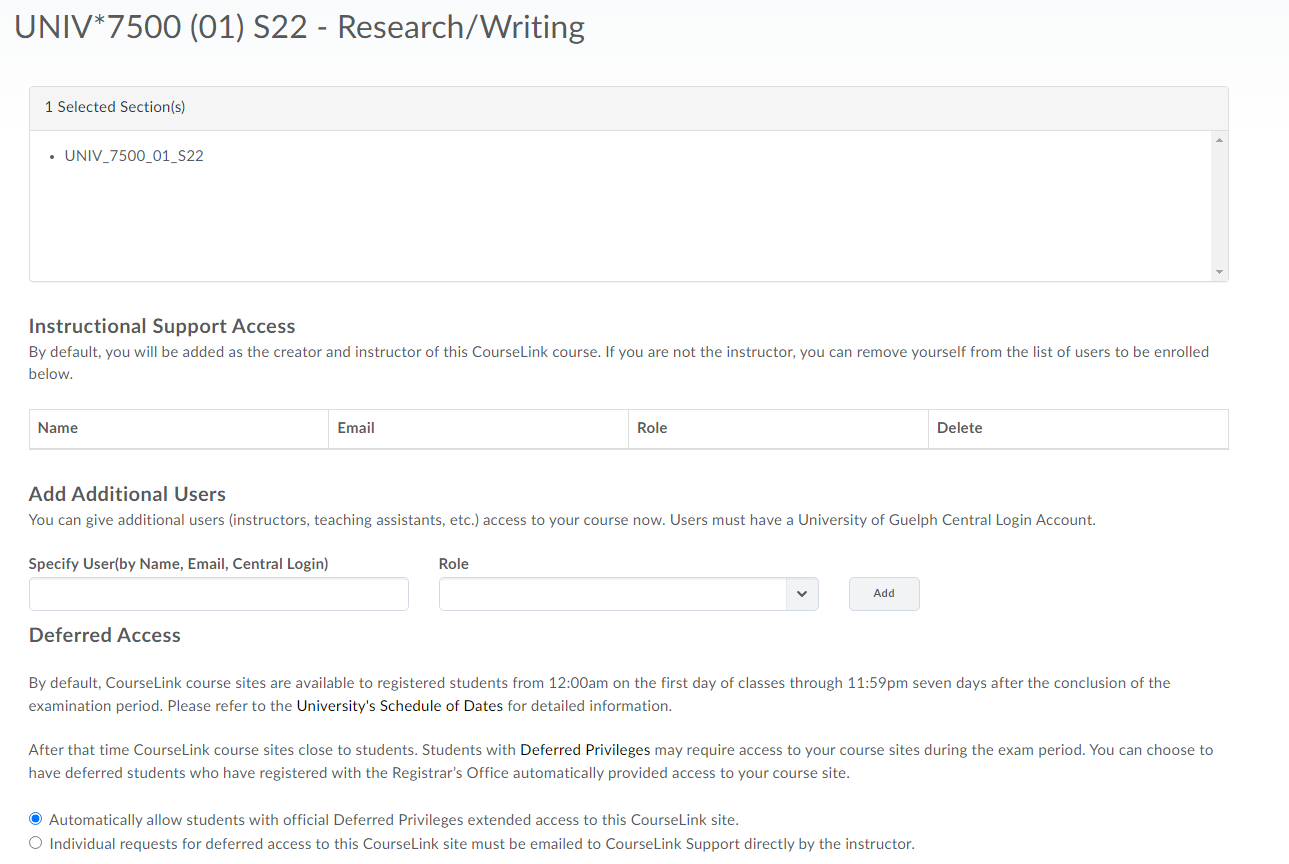
Course Offering Details

(6) Double check that the course offering details are correct. Add additional users here (Other instructors).

(7) If you plan on using teams an will need a security group you can click on the check box to have it setup. Please Note, It will take 24 hours after you check it off for it to become useable.

(8) Click “Create the CourseLink Course Site”

The picture describes the selected sections and it has a few options. The options in the image relate to Instruction support access, adding additional users and the deferred access condions.
A image showing the Classlist-linked Microsoft security group.


Related Resources and Programming:

Coming Soon!


Related Tools


Need More Help?

If you're still having trouble, please contact the CourseLink Support team for assistance.


Intelligent Agents
 

About Intelligent Agents

Intelligent agents are customizable messages automatically emailed to individual learners when they fulfill a particular task. For example, an instructor may choose to set an intelligent agent to let a student know when they have missed a deadline on an assignment.

Intelligent agents require initial set up (which can take less than 5 minutes!), then they work all on their own, in the background of a course. Modify the language in the messages as needed, to suit your audience.

Common Use Cases for Intelligent Agents

Here are some of the most common situations where using an Intelligent Agent (IA) might be beneficial to your learners:

  • Hasn’t accessed course in 2 weeks

  • Incomplete tasks on a checklist

  • Completed all tasks on a check list

  • Earned 80% or higher on quiz/assignment

  • Failed test

  • Late assignment

  • No posts authored in discussion topic

  • Received a grade/feedback on an assignment

  • Once a learner has reached a topic page in a long course to indicate half way or almost finished

Replace Strings

Replace strings help personalize the message being sent, such as addressing the email to the learner’s first name or indicating the date that a specific user last logged in the course. There are several replace strings that can be used in Intelligent Agents - here is the complete list. It is important to note, though, that some can be used only in the body of the message while others can also be used in the subject.

Creating Intelligent Agents

Tutorial Videos


Content Tool FAQs


Related Tools


Need More Help?

If you're still having trouble, please contact the CourseLink Support team for assistance.


Embedding Items

An example of embedded video

What is the difference between "linking" and "embedding"?

When you click on a web link, often written in blue underlined text, you are taken to a different web page. That new web page may load in your current web browser window or open a new window or tab. You have probably created links yourself–in email messages or in documents–by copying and pasting URLs, also known as web addresses, so you can share web pages with others. Others can click one of you links, and then their web browser will display a web page you wanted to share.

In contrast, embedding is placing media, most often a video, directly into a web page. Examples are YouTube or Vimeo videos included within articles in online magazines or news sites. You can watch such videos directly from the articles' web pages without having to follow a link off to YouTube or Vimeo.

The URL or web address used to create a link looks similar to:

https://www.youtube.com/watch?v=jgh1Igj_uU0

An embed code is usually much longer than a URL and looks similar to:

<iframe width="560" height="315" src="https://www.youtube.com/embed/jgh1Igj_uU0" frameborder="0" allow="accelerometer; autoplay; encrypted-media; gyroscope; picture-in-picture" allowfullscreen></iframe>

If a media item on the Internet is embeddable, somewhere at the site of that media item you should be able to locate an option to “Share”, “Get HTML code”, or “Embed”. Using that option and following the directions that appear will provide you with either an embed code you can copy-and-paste yourself or a list of sites to which you can share the media automatically. Be aware though that sometimes the owner of a media item is the only one who can share it.

Some websites, like Facebook, are clever enough to recognize links to popular video sites, such as YouTube, and automatically convert video links into video embeds. And some sites, like YouTube, provide you with buttons to share media directly to other sites without requiring you to know, or copy, a URL or embed code. In both cases though, behind the scenes something is still creating and using an embed code to put the video on the site where you chose to share it.

Where can I add embed code in CourseLink?

You can add embed code to any tool that uses the WYSIWYG editor. Some examples of tools include: Content (HTML pages), Discussions, and Announcements.

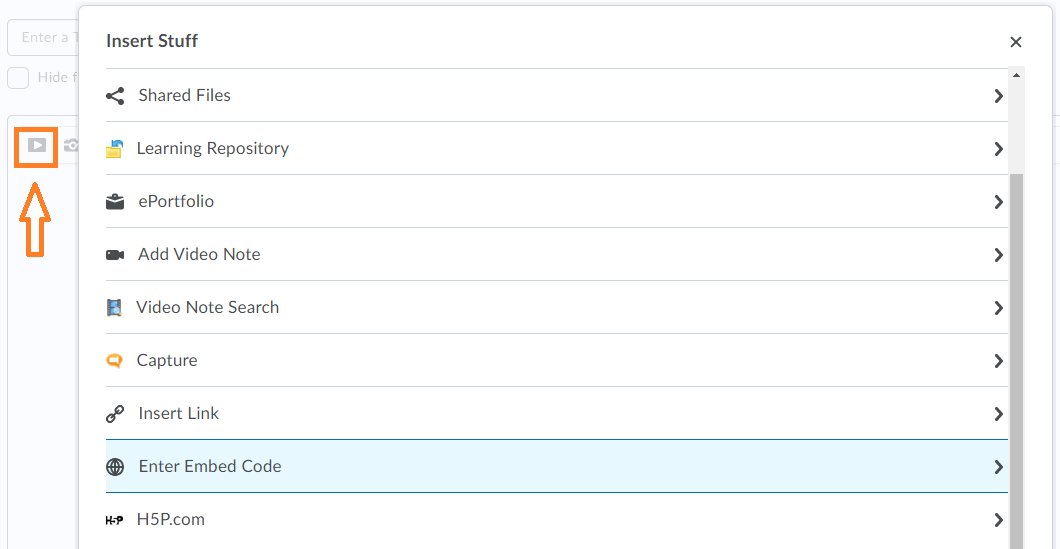
To embed something, click on the Insert Stuff button and scroll down to the Enter Embed Code option.

Selecting the Enter Embed Code option in CourseLink. A orange arrow is pointing to a orange box with the insert stuff button.


Need More Help?

If you're still having trouble, please contact the CourseLink Support team for assistance.


Source: https://wiki.millersville.edu/display/d2ldocs/Embedding+items

Class Progress
 

Track Course Progress

The Class Progress tool tracks your learners' overall progress as a course and individually.

You may want to use the Class Progress tool to do any of the following:

  • Monitor progress for any or all users in your course

  • Prepare progress reports

  • View user profiles, email users, or instant message users

  • Track when a user accesses the course and downloads course content

  • Track a user's grades, completion of learning objectives, access of content topics, participation in discussions, assignment submissions, quiz submissions, checklist completion, survey responses, and login history

  • Set up intelligent Agents for learners who are falling behind in a course

  • View feedback and submissions for assignments, discussion topics, and other assessments for individual learners

For content, the content must meet three criteria to be included in the learner's progress:

  • The learner must have access to the content

  • The content must be marked with a completion method of Required Automatic or Required Manual

  • The content is not exempt

When content does not meet these conditions, the topics are not included in the calculation of the learner’s progress.

Class Progress

From Course Admin, click Class Progress.

Overview of the Class Progress page. It has 4 orange circles with numbers 1-4 in them which relates to the text below the image.

1) You can filter class participants based on membership in groups or sections.

2) Use the Class Progress navbar to sort the order in which users appear in the chart. By default, the following performance indicators appear from left to right in the navbar: Content CompletedObjectivesLogins, and Grades. A maximum of 4 performance indicators can display at any time on the Class Progress page. Available indicators include: Content CompletedObjectivesDropbox SubmissionsGradesChecklist CompletionContent VisitedDiscussion ParticipationLogin HistoryQuiz Performance, and Survey completion. To change which indicators are displayed and which order they are displayed in, click Settings.

Note the following:

  • Login History indicates when the learner logged into Brightspace Learning Environment, not the course. However, Course Logins displays in each learner's User Progress report, which reports on when they accessed the course.

  • Absent period indicates the number of days since the learner last logged into Brightspace Learning Environment. For example, if "Oct 30, 2017 - absent period: 3" displays, the learner did not log in for 3 days, and an Oct 26 login displays below the Oct 30 login.

3) All course participants appear in the chart. Their name, username, and Org Defined ID display alongside their profile picture, if supplied. Their performance results for the listed indicators also display in the chart. Clicking on any area of this chart brings you to the individual user's User Progress page.

4) To adjust which performance indicators display by default, click Settings. You can also search for users by typing in the Search users field.

Tutorial Videos


Content Tool FAQs


Related Tools


Need More Help?

If you're still having trouble, please contact the CourseLink Support team for assistance.


Video Note

What is Video Note?

Video Note is an option available to instructors and students to create short videos of up to 30 minutes in length. Video Note is available with the following tools:

  • Announcements

  • Content

  • Discussions

  • Dropbox


How to use Video Note in Announcements

  1. Select the drop down arrow next to the Announcements tool on your course homepage (the first widget located under the course banner image).

  2. Select New Announcement.


  3. Add a title for your announcement in the Headline field.


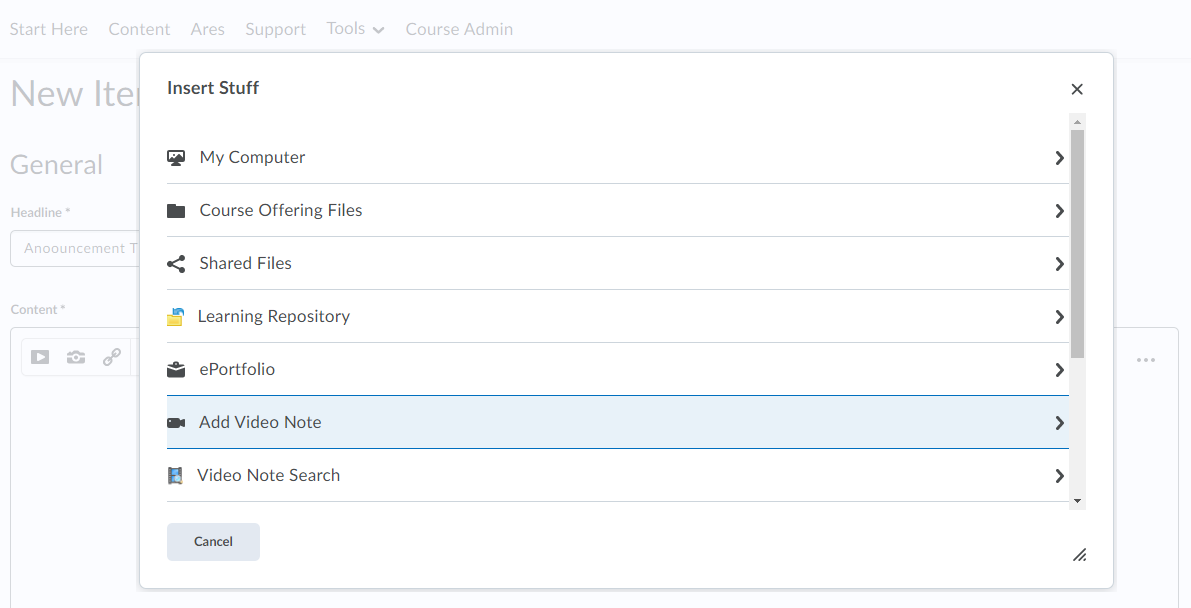
  4. Select the Add Stuff icon


  5. Select the option for Add Video Note.


  6. You will have two options available - Record Webcam Video or Upload File (if you already have an existing video that you would like to use).


  7. If you’d like to Record Webcam Video, scroll down to where it says New Recording.

  8. Click the New Recording button to start your recording.

    Note: if this is the first time you are using the tool the browser will ask you to allow webcam permissions. Please enable this permission.


  9. Click Stop Recording when you are done with your video.


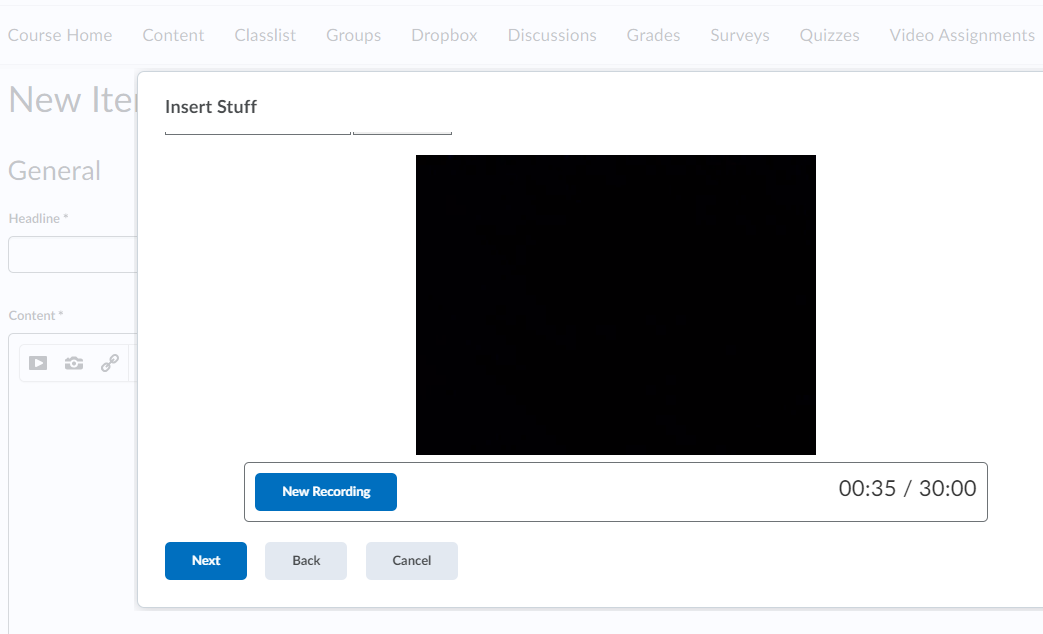
  10. Review your recording at this step. If you’d like to try again click New Recording to restart the process. If you are satisfied with the recording click Next.


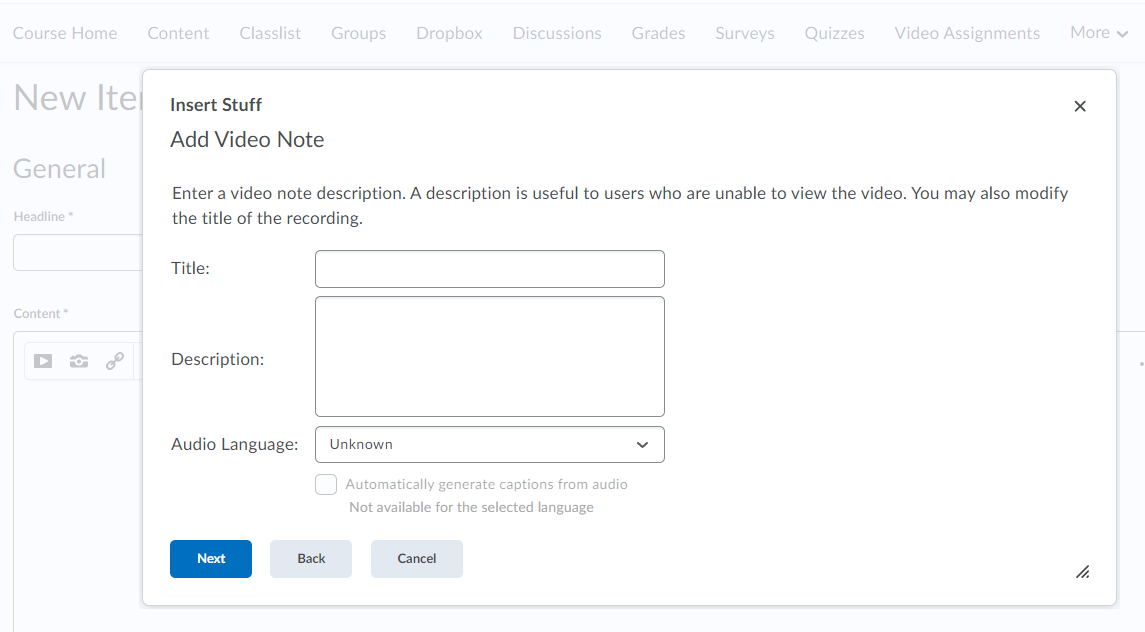
  11. Add a Title and Description for your recording (optional).

    Click Next.


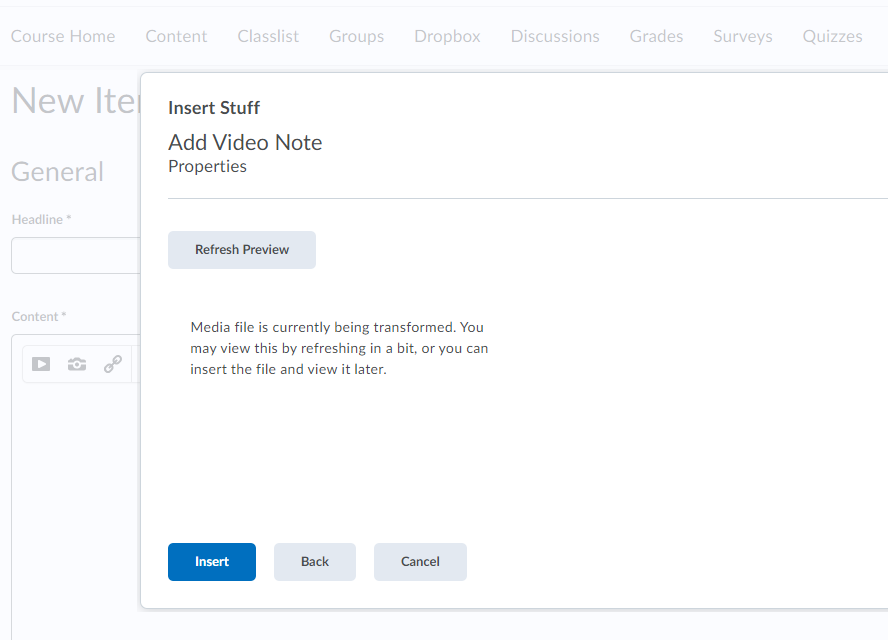
  12. Click Insert


  13. You should now see the recording appear under the Content section of the Announcement.


  14. Select Publish to make the video available to students.


How to use Video Note in Content

  1. Go to to Content section of your course and enter the content module you would like post in.


  2. Click the button for Upload / Create and select Create a File from the drop down.


  3. Enter a Title for your video


  4. Select the Add Stuff icon.


  5. Select the option for Add Video Note.


  6. You will have two options available - Record Webcam Video or Upload File (if you already have an existing video that you would like to use).


  7. If you’d like to Record Webcam Video, scroll down to where it says New Recording.

  8. Click the New Recording button to start your recording.

    Note: if this is the first time you are using the tool the browser will ask you to allow webcam permissions. Please enable this permission


  9. Click Stop Recording when you are done with your video.


  10. Review your recording at this step. If you’d like to try again click New Recording to restart the process. If you are satisfied with the recording click Next.


  11. Add a Title and Description for your recording (optional).

    Click Next.


  12. Click Insert.


  13. You should now see the recording appear under the Content section of the post.


  14. Select Save and Close to make the video available to students.

The upload/create button was pressed and a dropdown menu can be seen. It is highlighting in light blue "Create a File".
The Create a File page and it is highlighting in a red box the insert stuff button.
Insert stuff page with a few options. It is highlighting in a light blue Add Video Note.
The insert stuff window on the Add Video Note page. It has a black box where the video would be after clicking and selecting the upload video button.
The insert stuff window with a new recording button.
The insert stuff window with the stop recording button with a blue background.
Insert stuff button with the new recording button and next button with a blue background.
Insert Stuff window on the Add Video Note page. There is options to set the title and description.
Insert stuff window on the Add Video Note: Properties page. Can preview the post here and the blue insert button is located here.
The new announcement with a black video. The announcement title is "Announcement Title" and there is a blue publish button.
 

How to use Video Note in Discussions

  1. Go to to Discussion section of your course and enter an existing Discussion Topic you would like post in.

    .

  2. Click the button for Start a New Thread.


  3. Enter a subject for your video


  4. Select the Add Stuff button.


  5. Select the option for Add Video Note.


  6. You will have two options available - Record Webcam Video or Upload File (if you already have an existing video that you would like to use).


  7. If you’d like to Record Webcam Video, scroll down to where it says New Recording.

  8. Click the New Recording button to start your recording.

    Note: if this is the first time you are using the tool the browser will ask you to allow webcam permissions. Please enable this permission


  9. Click Stop Recording when you are done with your video.


  10. Review your recording at this step. If you’d like to try again click New Recording to restart the process. If you are satisfied with the recording click Next.


  11. Add a Title and Description for your recording (optional).

    Click Next.


  12. Click Insert.


  13. You should now see the recording appear under the Content section of the thread.


  14. Select Post to make the video available to students.


How to use Video Note in Dropbox

  1. Go to to Dropbox section of your course and either Edit an existing Folder, or create a New Folder.


  2. Enter a Name for your Dropbox folder.


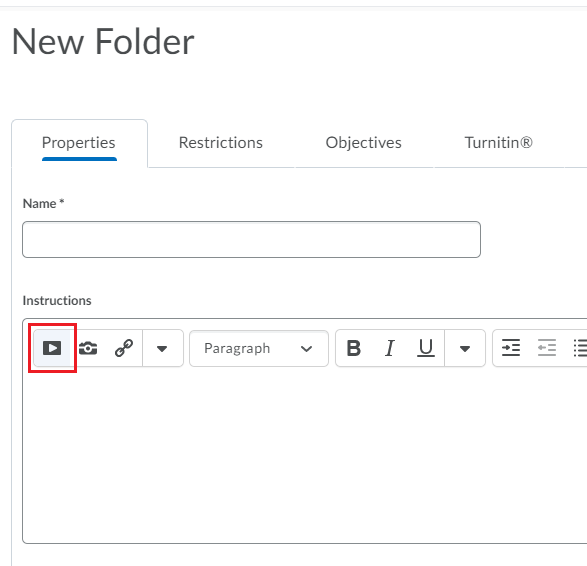
  3. Select the Add Stuff button.


  4. Select the option for Add Video Note.


  5. You will have two options available - Record Webcam Video or Upload File (if you already have an existing video that you would like to use).


  6. If you’d like to Record Webcam Video, scroll down to where it says New Recording.

  7. Click the New Recording button to start your recording.

    Note: if this is the first time you are using the tool the browser will ask you to allow webcam permissions. Please enable this permission


  8. Click Stop Recording when you are done with your video.


  9. Review your recording at this step. If you’d like to try again click New Recording to restart the process. If you are satisfied with the recording click Next.


  10. Add a Title and Description for your recording (optional).

    Click Next.


  11. Click Insert.


  12. You should now see the recording appear under the Instructions section of the folder.


  13. Select Save and Close to make the video available to students.


Need More Help?

If you're still having trouble, please contact the CourseLink Support team for assistance.