
About Gradescope Bubble Sheet Assignments
Gradescope bubble sheet assignments allow instructors to incorporate auto-graded multiple-choice questions into their written quizzes, midterms, and final exams. Gradescope’s bubble sheets accommodate answer keys for up to 200 multiple choice questions. Gradescope grades bubble sheet assignments automatically once students have filled out the bubble sheet template and the sheets have been scanned and uploaded to Gradescope by the instructor.
Gradescope Has Replaced Scantron
Scantron and the CCS Test Scoring application are no longer available to instructors for quizzes, midterms or exams. Beginning in F22, Gradescope Bubble Sheet Assignments replaced Scantron as the supported automated multiple-choice assessment solution at UofG.
Resources for Students
Instructors may direct students to our Tips for Completing Gradescope Bubble Sheets page or include the link in their course site. Alternatively, instructors may provide a direct link to our Gradescope Bubble Sheet Tips for Students video via CourseLink.
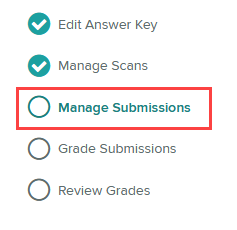
The Gradescope Bubble Sheet Process
A bubble sheet assignment in Gradescope can be set up in minutes and once pages are scanned, the paper-to-student matching and grading processes can also be completed quickly. The basic steps of the process of creating a bubble sheet are outlined below:
Scan Completed Bubble Sheets to PDF (self-scan or via the CCS Gradescope Bubble Sheet Scanning Service)
Upload Scanned Bubble Sheets to Gradescope (Manage Scans)
Match Bubble Sheets to Students (Manage Submissions)
Confirm Uncertain Marks (Grade Submissions)
Post Grades to CourseLink (Review Grades)
Accessing Gradescope and Creating Bubble Sheet Assignments
Gradescope can be accessed in two ways:
Through the CourseLink Integration (Content Tool)
Through gradescope.ca using the School Credentials option and Single Sign On (SSO)
CourseLink Integration
It is recommended bubble sheet assignments be created directly through the CourseLink Integration. The CourseLink Integration allows instructors to connect their course site to an existing Gradescope assignment or create a new Gradescope assignment via the Content tool. With the CourseLink integration, a corresponding grade item is automatically created and associated with the Gradescope assignment in CourseLink’s Grades tool. Scores and grades can then be pushed from Gradescope assignments to their associated CourseLink grade item. The CourseLink integration also enables instructors to sync their Gradescope course’s Roster with their CourseLink course site’s Classlist, populating the Gradescope course with students, TAs, and additional instructors.
To learn how to create a Gradescope assignment via the CourseLink integration, please follow the steps outlined on the Gradescope-CourseLink Integration page.
Print the Gradescope Bubble Sheet Template
Gradescope’s bubble sheet template can be downloaded any time from the Answer Key page of your bubble sheet assignment.
It is recommended that staff print multiple copies of the bubble sheet template on standard 8.5” x 11” (Letter) sized paper rather than make photocopies of a printed bubble sheet to maintain quality prior to scanning. If photocopied, there is greater potential for errors during the student-to-sheet matching and grading processes in Gradescope.
If required, coloured paper can be used when printing the bubble sheet template to help differentiate versions for students, however only light coloured paper is recommended (light yellow, light grey, light pink, etc.).
Please note you do not need to create the answer key before printing or before students complete their bubble sheets!
For convenience, direct links to a single page (100 question) version of the template as well as the full two-page, 200-question version are available below:
100 or less bubble sheet questions template (single page)
Over 100 bubble sheet questions template (two pages, print double-sided)
Alternatively, you may download the 200-question template from Gradescope by following the steps below:
- Click the link to your bubble sheet assignment created in your course site’s Content tool or log into gradescope.ca and select the appropriate course and bubble sheet assignment.
- From the menu on the left side, select Edit Answer Key.

- Click the 200-question template link.

- Print as many copies of the template as required on standard 8.5” x 11” (Letter) sized paper to distribute to students. Ensure that 8.5" x 11" sized paper is used when printing, as use of other paper sizes will interfere with the answer recognition process. We recommend printing a few extra copies as well.
Note: If you have 100 questions or less, only print page 1. If you have more than 100 questions, print both pages. If you plan to use the CCS Gradescope Bubble Sheet Scanning Service, two-page sheets must be printed double-sided.
Understanding Bubble Templates
The bubble sheet template contains the following fields where students can add information:
- Name (required)
This is where students must print their first and last names. Gradescope uses advanced text-recognition to read the names and match the sheets to students on your Gradescope Roster (synced from the CourseLink Classlist tool). - ID (recommended)
This is where students enter their student ID number (e.g., 87654321). Gradescope uses this as a secondary field to match students to papers and increase the chance of a successful match. - Section (optional)
Students may indicate their course section here. Gradescope does not read this field. - Date (optional)
Students may use this to indicate the date on which they completed the bubble sheet. Gradescope does not read this field. - Version (required if using multiple versions of the Answer Key)
Students should bubble in the version of the exam they received if you are providing multiple versions of the assessment. You may also manually pre-fill this field after printing and distribute the assessment with the appropriate exam booklets. Gradescope uses this section to determine which answer key should be used to grade each bubble sheet. - Other (optional)
This field may be used for any purpose the instructor deems necessary (e.g., information to help with additional sorting requirements). Gradescope does not read this field.

Scan Completed Bubble Sheets
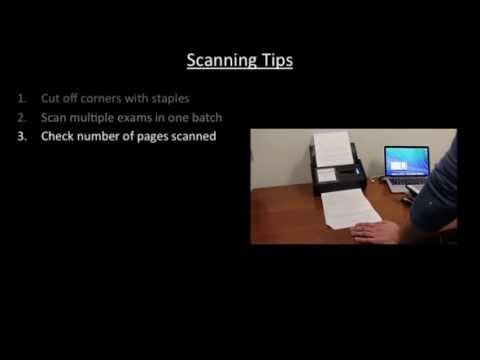
Gradescope bubble sheets use standard 8.5” x 11” paper and can be scanned to a PDF file using any scanner. As a result, instructors now have added flexibility to self-scan their bubble sheets using a personal scanner or their department’s scanner. Alternatively, instructors may bring their single-page Gradescope bubble sheets to the CCS Support Desk in Johnston Hall to leverage their Gradescope Bubble Sheet Scanning Service.
If the self-scan option is selected, please note that Gradescope recommends the following settings:
150dpi (a higher dpi setting may improve page-splitting and student matching)
No page auto-rotation (you can rotate pages in Gradescope if needed)
No blank page removal (you can remove blank pages in Gradescope if needed)
A maximum of 80 submissions per PDF file (avoids potential issues with automatic page splitting).
Note: Splitting the PDF using the OpenEd Toolbox or Adobe Acrobat can be done after scanning as well.
For all Gradescope scanning, we also recommend that papers be kept flat (not folded or creased) to improve the scanning process and quality of the file produced. Creases in papers can appear in the scan and may interfere with Gradescope’s ability to recognize student-inputted information and paper split points.
A PDF file of the scanned bubble sheets is required for student-to-sheet matching and grading. You may upload multiple PDF files (e.g., scan section sheets 01 on Monday, section 02 sheets on Tuesday) or a single PDF file containing all scanned sheets (a maximum of 80 submissions (pages) per file is recommended). Completed bubble sheets do not need to be manually presorted, even if versioning is used.
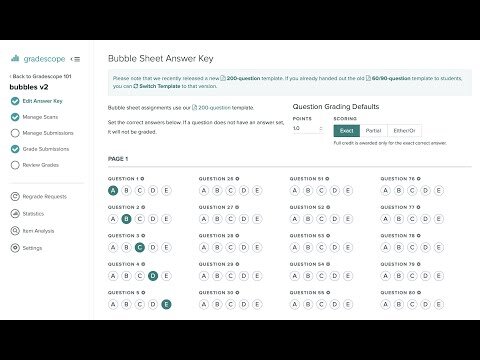
Create the Answer Key
All questions on the bubble sheet are set with a standard point value (default = 1 point per question) and a standard scoring method (default = exact). Gradescope provides 3 different scoring methods: Exact, Partial, and Either/Or. These defaults can be adjusted in the top-right side of the Answer Key page.
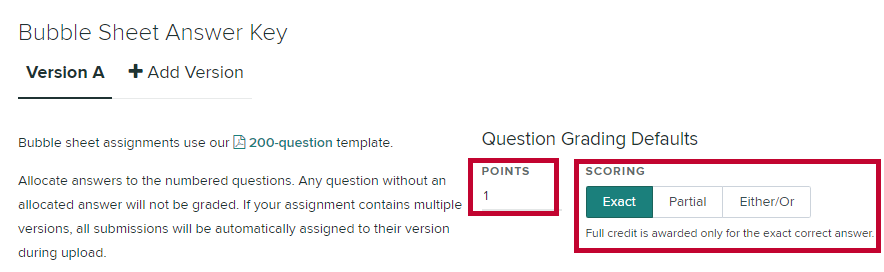
Individual questions can also have their settings changed to use a different point value and/or a different scoring method by clicking the cog icon to the right of the question number on the bubble sheet.

To create an answer key for a bubble sheet assignment, please follow the steps below.
- If using the CourseLink integration, access the bubble sheet assignment on Gradescope from the link created in your Content tool. Alternatively, you may access gradescope.ca and sign-in, then select the appropriate course and assignment.
- From the menu on the left side, select Edit Answer Key.

- Choose the correct answers by selecting the appropriate letter bubbles. Any questions that are left blank will not be graded.

- If you are using multiple answer key versions for the same quiz, midterm, or exam, you may use the + Add Version option next to Version A located in the top-left to add an additional version. Indicate the correct answers on the new version and repeat as required for additional versions. Up to 4 additional answer key versions can be added for a total of 5 (versions A, B, C, D, and E).
Note: When using multiple versions, please be certain to clearly indicate to students which version they have received on their exam booklet and remind them to bubble in the version they received on the Version section of their bubble sheet.

- Click the Save Answer Key button located in the bottom right corner to save the key.

Upload Scanned Bubble Sheets (Manage Scans)
If using the CourseLink integration, access the bubble sheet assignment on Gradescope from the link created in your Content tool. Alternatively, you may access gradescope.ca and sign-in using SSO, then select the appropriate course and assignment.
From the menu on the right side, select Manage Scans.
Click on Select PDF Files to upload scanned bubble sheets to Gradescope (Max file size that can be uploaded is 256 MB).
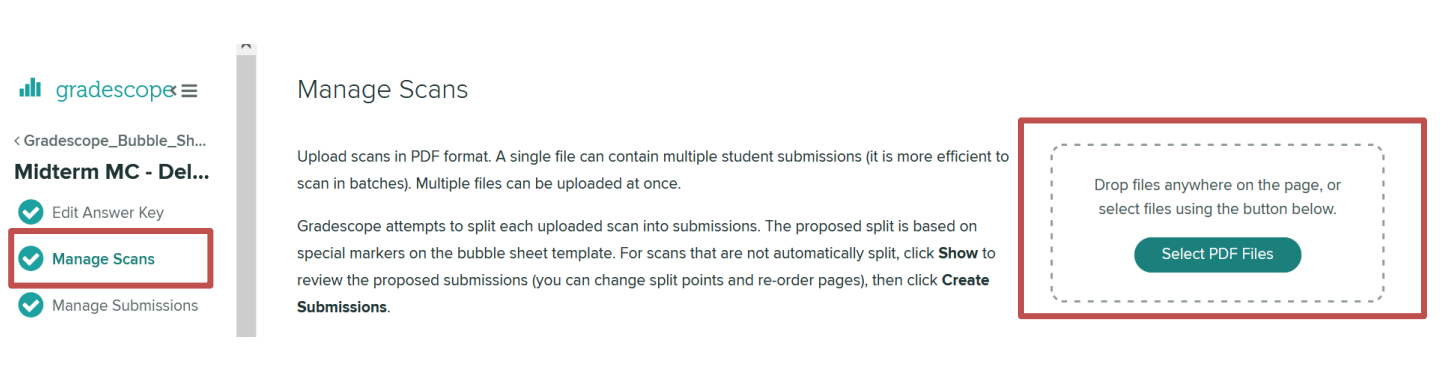
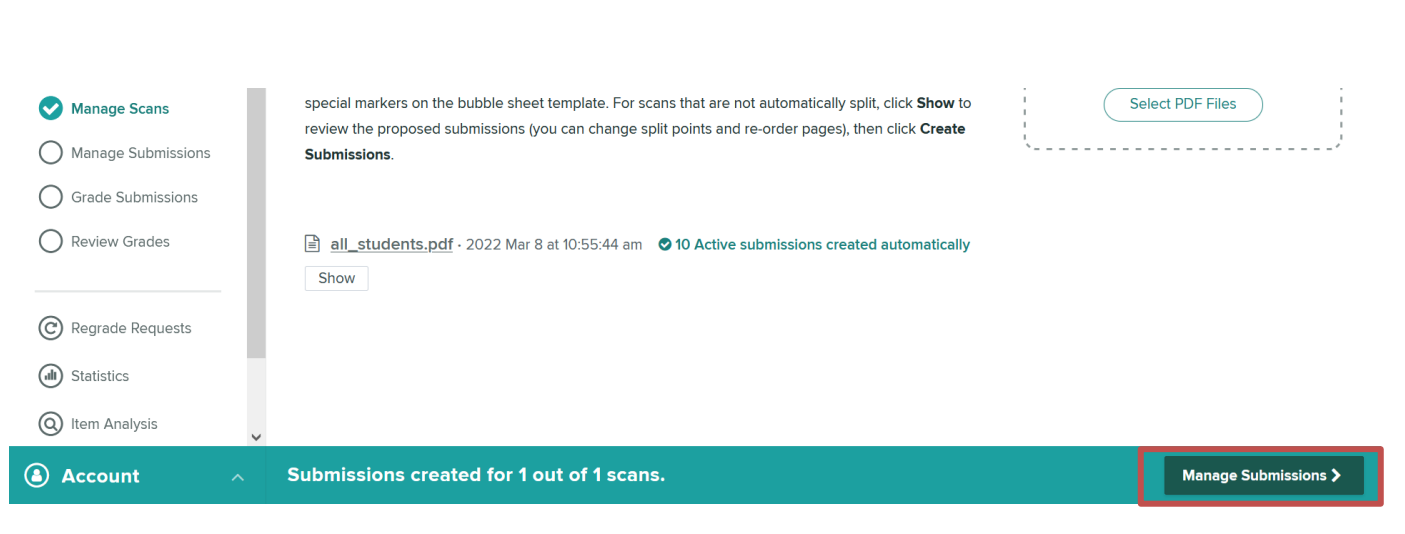
- Gradescope splits the scans into their appropriate pages per student. If any pages have not been split correctly or need to be rotated, they can be manually adjusted.
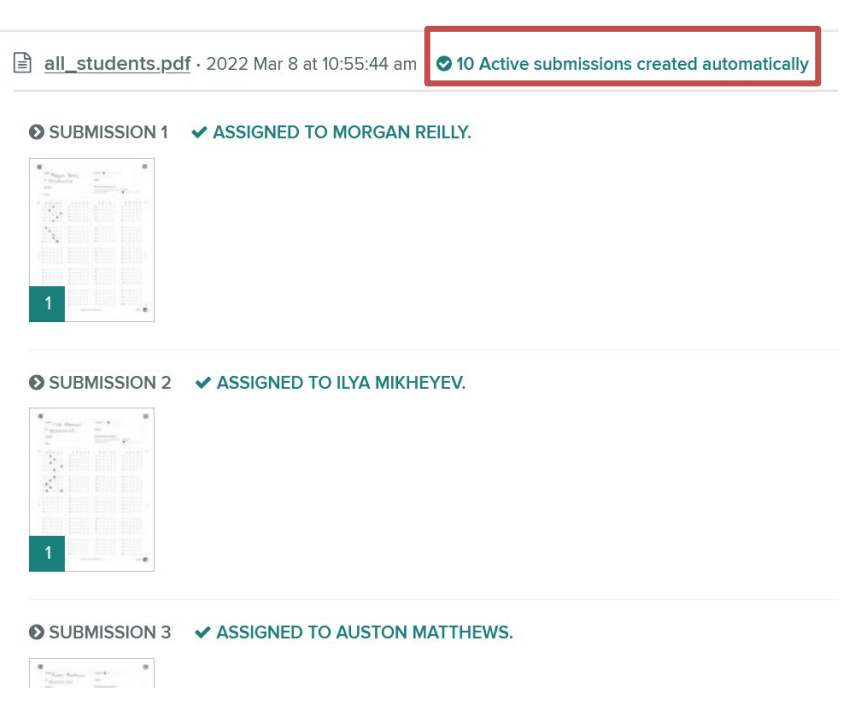
- When everything is correct, click Manage Submissions to match the scans to the students.
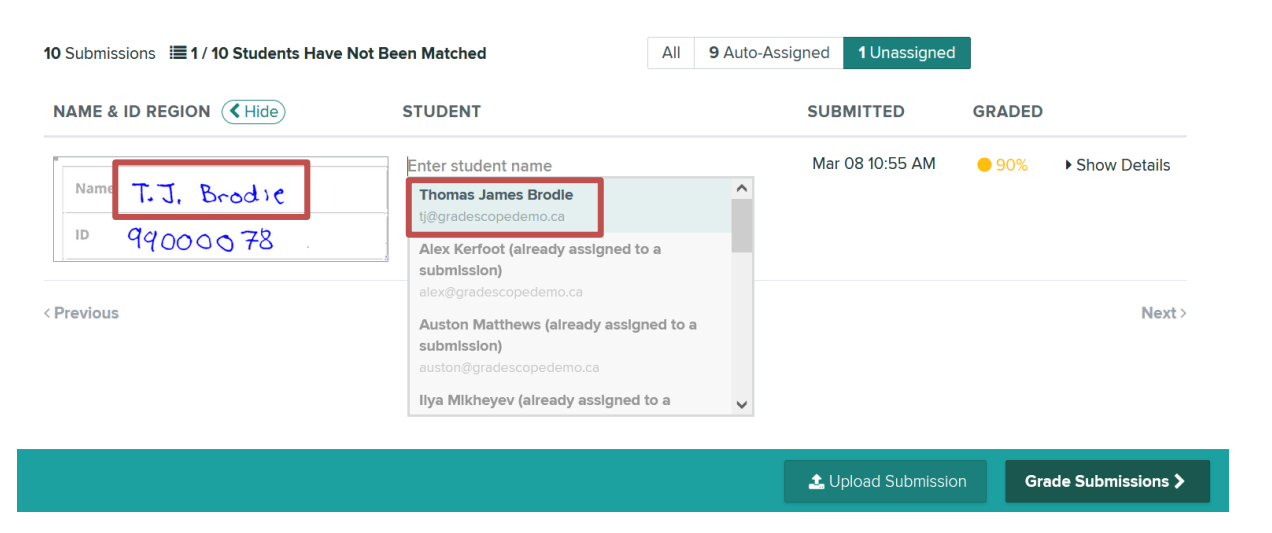
Match Bubble Sheets to Students (Manage Submissions)
Please note that Gradescope uses advanced text recognition to auto-assign completed bubble sheets to students listed on the Gradescope roster. For the most accurate matching, it is recommended that you first re-sync the Gradescope roster with your CourseLink course site’s Classlist by selecting Roster from the menu and then clicking the Sync CourseLink Roster button to ensure that you have the most up-to-date list of students on Gradescope.
When ready to match students to the bubble sheet scans, please follow the steps below:
- Access the bubble sheet assignment and from the left menu, select the Manage Submissions page.
- If any bubble sheets are not auto-assigned to students, you may manually match them by clicking on the Unassigned tab in the upper right corner. For these submissions, click on Enter Student Name in the student column, type in the any part of the name or ID of the student and select the appropriate match.
Tip: Press Tab (rather than Enter) to select the user and repeat until there are no more unassigned submissions. When you are finished assigning submissions to students, you may still see "X/Y Students Have Not Been Matched." This count includes students that have not provided a submission. Ensure that when you are finished, the 'Unassigned' count displays '0'.
- If using multiple answer key versions, check for an indicator for Uncertain Versions. This will appear if any students have not properly filled in the Version section of their bubble sheet.

If present, click the indicator to view sheets with uncertain versions. The students will be listed, displaying their version section of the bubble sheet indicating the scores they would receive for each version. Select the correct version based on that information.

- Once all the bubble sheets have been matched to students, click the Grade Submissions button to score the bubble sheets and resolve any uncertain marks.
Confirm Uncertain Marks (Grade Submissions)
Gradescope will automatically grade the bubble sheets based on the answer key. If it cannot confidently determine which answer was bubbled-in by some students, you will be prompted to confirm uncertain marks.
To confirm uncertain marks, please follow the steps below:
- Select Uncertain Marks at the top of the Grade Submissions page or select the Uncertain Marks indicator next to a specific question.

- The Review Uncertain Marks window will appear. From here, a preview of the uncertain marks will appear along with filled bubbles indicating which answers the Gradescope AI thinks is a match. Select/deselect bubbles as necessary before confirming.

Note: If it is unclear which bubble should be selected from the preview, you may hover your cursor over the bubble options and use the zoom out (magnifying glass icon) option to see the original scan of that question.

- Once all uncertain marks have been confirmed, grades can be posted to CourseLink by clicking on the Review Grades option in the menu.
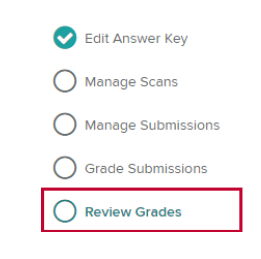
Post Grades to CourseLink (Review Grades)
Please note that this step is only available when the bubble sheet assignment is linked to CourseLink via the integration.
To post the grades from your bubble sheet assignment to the corresponding grade item in CourseLink, please follow the steps below:
- From the left menu, click on Review Grades.
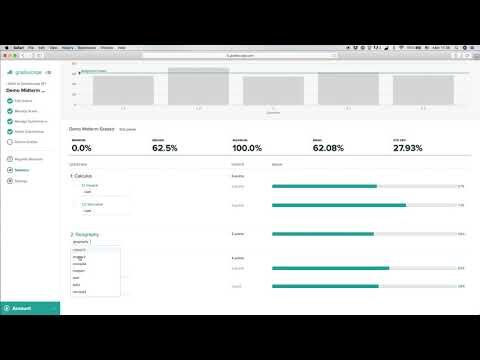
- The Review Grades page will display statistical information on how the students performed as well as the specific scores achieved for each student. You may review this information to confirm results prior to posting grades.
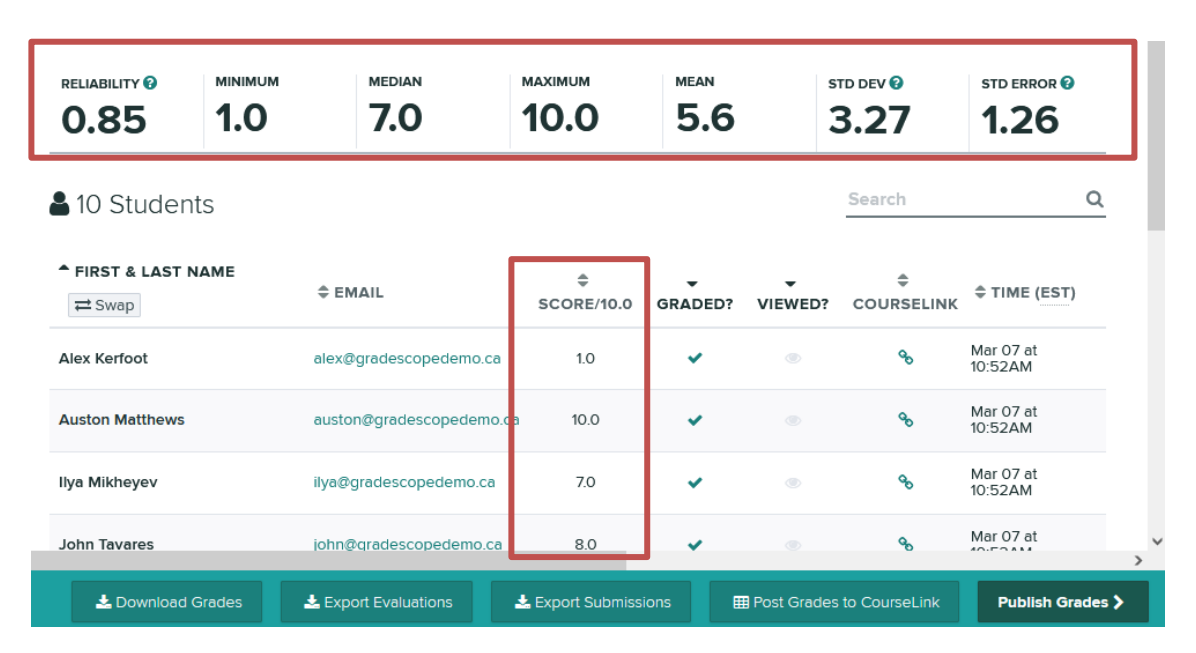
- To send bubble sheet scores from Gradescope to CourseLink, click on the Post Grades to CourseLink button. A prompt appears indicating the CourseLink course site and grade item that is linked with the assignment. If correct, click the Post Grades button.
Note: For bubble sheets, we do not recommend clicking Publish Grades as there will likely not be any feedback for students to review on Gradescope. Publishing grades will only provide students with a view of their completed bubble sheet and may cause unnecessary confusion.

Accessing Statistics and Item Analysis
Gradescope provides two options for accessing data related to bubble sheet assignments: Statistics and the Item Analysis Report. More information on these options is available through the Gradescope Help Centre.
Related Videos
Related Programming
Gradescope Online Drop-ins (Tue. 10 AM / Wed. 2 PM)
Weekly Online Workshop: Get Started with Gradescope (Thu. 12 PM)
Introduction to Gradescope Bubble Sheets Session 1(05/10/2023)
Introduction to Gradescope Bubble Sheets Session 2(22/11/2023)
Prepare for Gradescope Bubble Sheets (05/12/2022)
Other Gradescope Assignment Types
Other Gradescope Scenarios
Gradescope Support
Additional Support information for Gradescope can be found on our Gradescope Support page.
If you need further assistance, please contact CourseLink Support.