Editing Course Content in i:Create
Pilot Participants Only
The information on i:Create is intended for participants in the i:Create Course Prep Pilot Project only.
If you are not part of this pilot project, please refer to the course prep instructions provided by your online learning quality assurance specialist at Open Learning and Educational Support.
Editing and Restoring in i:Create
Selecting Content to Edit
From your list of course content, click on the page title of any of your listed course pages to edit it. Note: It is recommended that you edit one page at a time and in one browser tab at a time. Having multiple editing tabs may lead to duplication or loss of edits.

Activating Edit Mode
You can begin to edit the page by clicking anywhere on the page content. This will launch the editor interface.
Navbar Icons
The edit content page includes three icons at the top-left of the page:


Back To List: returns to the list of course content.

Publish Page: will post the current state of the page to CourseLink.

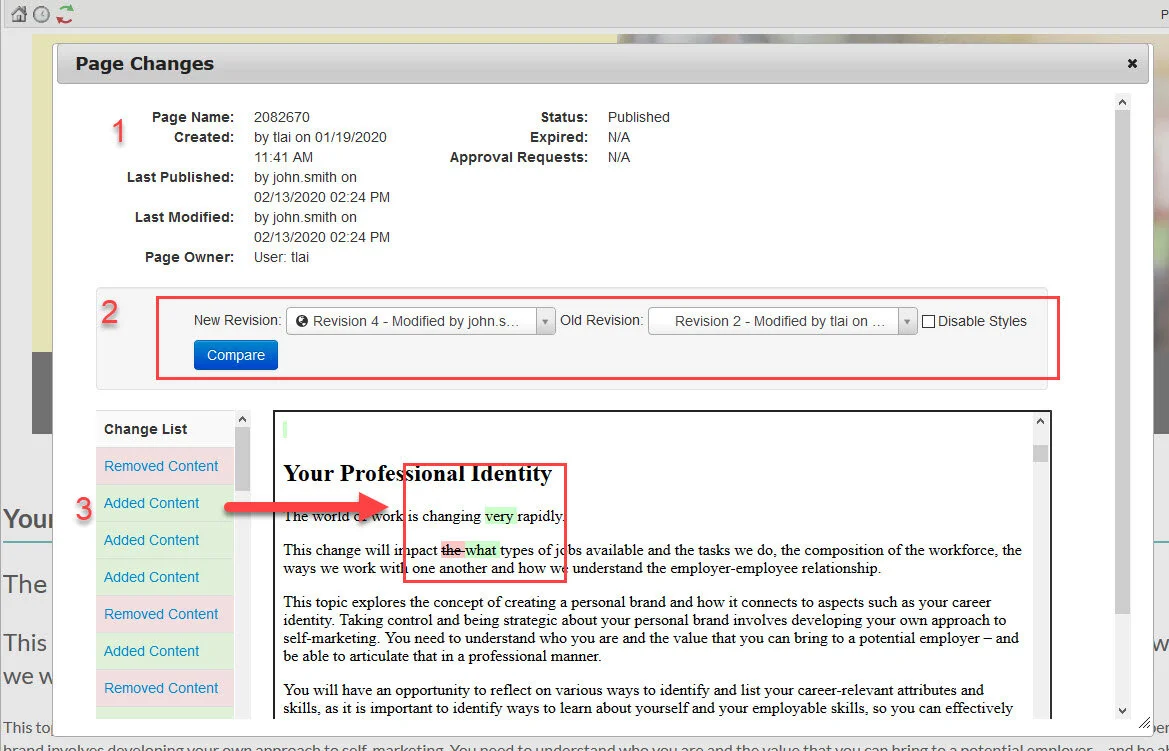
Page Changes: allows a user to compare the saved versions. This page is made up of three sections:
The page details - which includes when the page was last published to CourseLink, when it was last modified and by which user.
The comparison selection menu. from this menu two versions of the current page can be compared. select two different revisions and click ‘compare’.
Any revisions listed with a globe icon indicates a revision that was published to CourseLink - other revisions that were saved revisions (that were not published to CourseLink) are listed as well.The comparison window shows the current state of the page, and both lists the changes to the page on the left-hand menu, and highlights any changes in the main window.
Editing Toolbar
You can begin to edit the page by clicking anywhere on the page content. This will launch the editor interface.

Save
The Save button saves any modifications you have made to the contents of the page. Note this will not publish these changes to CourseLink - you can save pages while you make revisions (including to multiple pages) - before publishing these changes. Pages that have been saved, but not published, will have the status of ‘Changes Pending’.
Each time this button is clicked it creates a new Revision of the page's Editing Version (Editing Version is explained further in the Administrative Interface section). The Save button also causes the page to refresh, while running a number of cleanup scripts to assure your page looks and functions as it should.
i:Create will time out after approximately 20 minutes with no activity. Saving resets the timer, so saving frequently will prevent the frustration of having to stop and re-login to the editor. If the i:Create system times out while you are using it you will be asked to log in again on attempting to save.
Note that once a page is saved the Undo and Redo tools will no longer be available (until you edit the page further). Saving confirms all changes to the page so they cannot be undone (or redone). For more details on the Undo and Redo tools see below.

Undo/Redo
The Undo button will reverse the effects of your last change to the page. Most content changes can be undone using this tool, however there are some table editing effects that it will not remove. Most browsers will allow you to use the Undo button to step backwards through your work up to 10 times. As with many applications, the keyboard shortcut for Undo is CTRL + Z.
The Redo button will reverse the effects of clicking the Undo button (it undoes the undo).

Spell Checking
The tool will open the Spell Checking dialogue box.
Spell checking can be done in one of two ways. To spell check specific text select it and click the Spell Checking button. If you prefer to spell check an entire block simply click anywhere inside that area and click the Spell Checking button.

Remove Formatting
The Remove Formatting button is intended to remove "junk" code that is carried over when text is copied and pasted directly from Microsoft Word or other similar applications. This tool should be considered as a last resort only as there are types of code embedded in some copied text that it cannot remove. If possible, rather than using this tool, delete the mistakenly copied text and use the Paste as Plain Text or Paste from Formatted Document tool (see below for more specific information).

Copy
The Copy button copies the selected text to the clipboard so that it can be pasted elsewhere. You can also copy text using the CTRL + C keyboard shortcut.

Paste
The Paste button pastes the contents of the clipboard into the page at the current cursor location. You can also paste text using the CTRL + V keyboard shortcut.

Paste as Plain Text
The Paste as Plain Text button operates as a toggle, allowing you to strip the formatting from copied material as you paste it into your page. Clicking on the button causes it to highlight, letting you know that the next item pasted will have all formatting removed. Once you paste text into a page using this tool it shuts off automatically. If you would like to past in additional plain text you will have to click this button again to turn the tool on.
This tool removes all formatting including numbered and bulleted list, italics, underlines, bolding, links, fonts, sizing, many line breaks, tables and colour changes.

Find
The Find button can be used to locate specific pieces of text within your website's content. Clicking the button opens the Find dialogue box.

Enter the search term in the Find What field. Direction allows you to search the document either before or after the current entry, and Match Case makes your search case sensitive. Click the Find Next button and you will be shown each consecutive instance of the search term on your page.

Find and Replace
The Find / Replace button operates much as the Find tool, but differs in that it allows the located search term to be replaced with new text. Clicking the button opens the Find / Replace dialogue box.
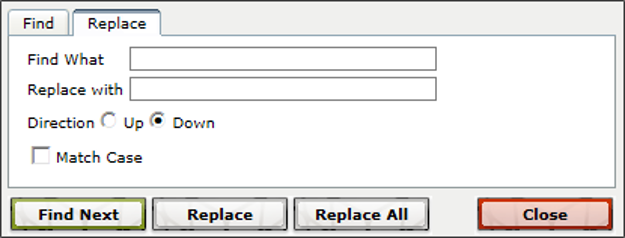
The text to be replaced is entered into the Find What field, and the text that will replace it is entered in the Replace With field. Direction allows you to search the document either before or after the current entry, and Match Case makes your search case sensitive. Click Find Next to locate the next instance of your search term and Replace to replace one instance at a time. Click Replace All to replace all instances of your search term on the page.

Font Style Tools
The Font Style buttons all function similarly. To apply a bold, italic, underline, superscript or subscript effect to text select it and click the appropriate button. To remove the effect select the text and click the button again.

Font Format Dropdown
The Font Format dropdown allows you to add HTML Headings to your page content. To add a heading place your cursor within the block of text you wish to format and select the type of heading you would like from the dropdown. Like the Alignment and Indent tools the heading will affect an entire block of text. If you find that your headings are being applied to more content than you would like make sure your target text is separated from everything else by paragraph breaks.
To remove a Heading from a block of text place your cursor anywhere in the block and select Paragraph from the Font Format dropdown.

List Tools
The Insert / Remove List buttons create either ordered (numbered) or unordered (bulleted) lists. The easiest way to create either style of list is to create each of your list points one at a time and separate them with a paragraph break (inserted by hitting the Enter key). Once you have created all your items select them and hit either the Insert Ordered or Unordered List button.

Alignment Tools
The Alignment buttons allow you to change the alignment of elements on your page, including text, tables, and images. To set a particular style of alignment select the item you wish to align and click the appropriate button. Note that alignment applies to blocks of content that are usually separated by a paragraph break. If you find that an alignment tool is affecting more content than you would like try placing your cursor between the elements and hitting Enter. This should separate the elements and allow them to be aligned separately.

Indent Text Tools
The Indent Text and Remove Indent buttons allow you add or remove space at the left margin of your text. The amount these tools indent is defined by the style sheet that formats your page and cannot be controlled by the editor. Much like the Alignment tools the Indent tools will make changes to the entire block of text. If they are affecting too much of your content, separate your paragraphs into smaller elements by placing your cursor within the block and hitting Enter. These tools are also used in conjunction with the List tools to create sub-lists.

Block Quote
The Block Quote button converts a selected paragraph to a block quote. Block quotes are intended to denote a quotation from an outside source, such as a study or essay. A block quoted paragraph is indented on both the left and right, but avoid using this as a tool for indenting. Block Quote uses a specific type of coding that can conflict with other forms of indenting, as well as causing problem with accessibility in some rare cases.

Insert / Edit Anchor
The Insert / Edit Anchor button inserts an invisible element that can be used with certain types of links as a target for navigating within a page (as opposed to between pages).
Once an anchor is inserted into a page it will be marked with a small icon. If you would like to edit the anchor name you can select the icon and click the Insert / Edit Anchor button again to reopen the dialogue.

Insert / Edit Link
The Insert/Edit Link button converts the selected image or piece of text into a hyperlink. Note that unless you have an image or text selected the tool will remain greyed out. Clicking the button opens the Insert/Edit Link Dialogue.

To edit a link after it has been created select the image or place your cursor anywhere within the link and click this button.

Remove Link
The Remove Link button is used to remove a link from an image or piece of text. Select the link image, or place your cursor anywhere within a piece of linked text and click this button to remove the link. Note that the text or image itself will remain.

Citation
The Citation button converts the selected text into a citation. Citation is only used following a block quote (see its tool description, above), and provides a reference to the source of the cited information. Clicking the button will open the Citation dialogue, which contains only a title field. The title will appear if a site visitor moves their mouse over the citation.

Abbreviation
The Abbreviation button creates an annotation explaining the meaning of an abbreviation which is activated by passing your mouse over the specified text. To create an Abbreviation select the relevant text and click the button to open the Abbreviation dialogue.
Enter the full text of the abbreviation into the title box and hit Submit (e.g. if the abbreviation were SEO you would enter Search Engine Optimization in the dialogue box). Abbreviation also has applications with Assistive Technologies. If a person is using a screen reader the abbreviation will be read out as its individual letters, instead of being sounded out as a single word.

Acronym
The Acronym button operates in an identical fashion to the Abbreviation button, with one minor exception. Persons using assistive technologies with have the letters of the acronym sounded out for them as a single word rather than it being read as individual letters (e.g. NASA is always pronounced as a single word, rather than read out as 4 individual letters).

Insert Special Character
The Insert Special Character button will allow you to add characters to your content that are not normally part of your keyboard. Place your mouse where you would like to insert the new character and click the button to open the character selection dialogue.

Click the character you would like to insert and the dialogue will close and your selection will be added to your content.

Insert Date
The Insert Date button will place a year-month-day date stamp into your document at the current mouse location. This date is taken from your system clock and does not automatically update.

Insert Time
The Insert Time button will place a time stamp into your document at the current mouse location. This time is taken from your system clock and does not update.
Content Blocks
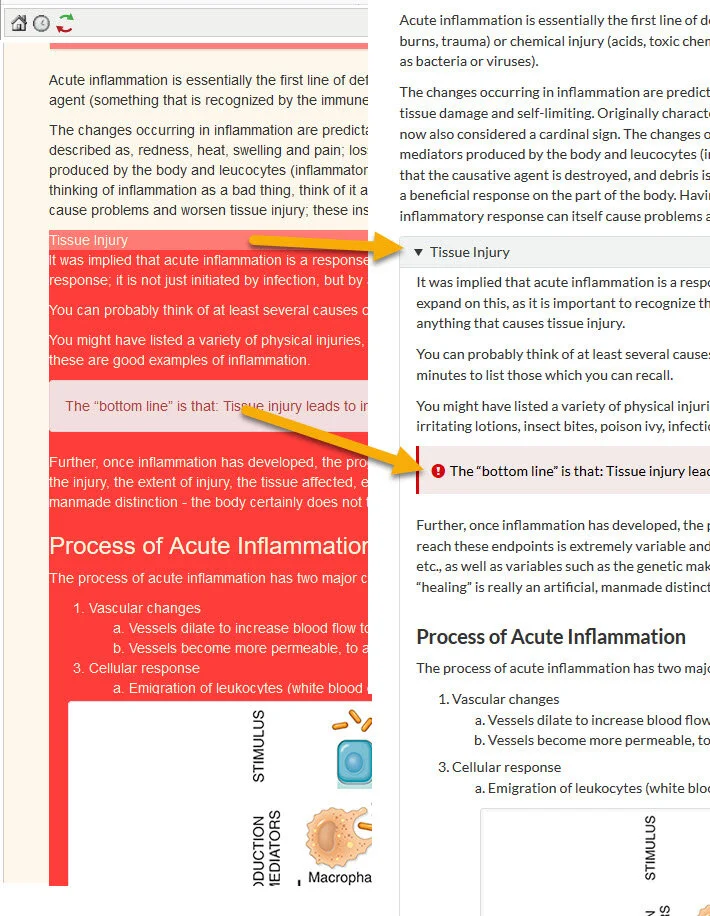
When editing content in i:Create your content will be defined by colored blocks. You can revise any of the text in these areas, but will not be able to remove or change the order of the text or title blocks.
Below is an illustration of how a single page looks in i:Create and in CourseLink. On the left you see the page in the i:Create editor, with text blocks highlighted in red. On the right you see the page as it appears in CourseLink once published.